Artist Pro 24 (Gen 2) Drawing Display
Contents
Introduction
Product Settings
FAQs
 PDF
PDF1. Product Overview
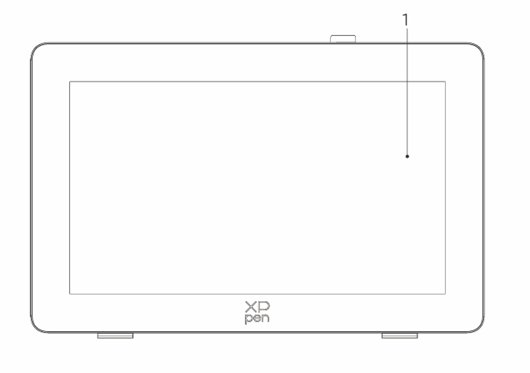
1. Display/Work Area
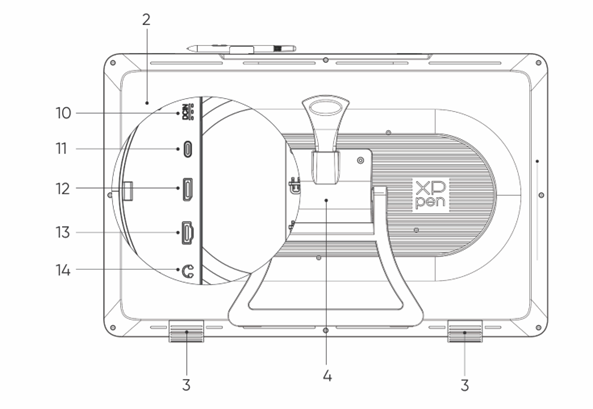
2. Back Cover
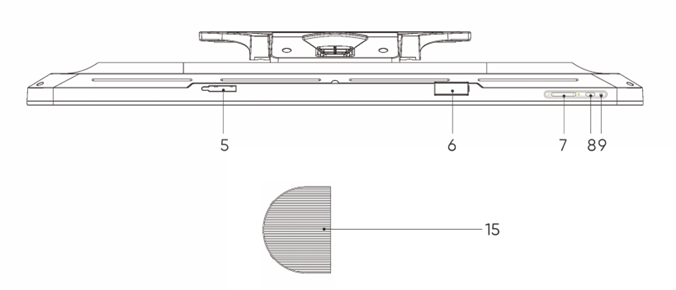
3. Non-Slip Feet
4. Adjustable Stand
5. Pen Clip Compartment
6. Pen Clip
7. Brightness + / - Buttons (signal source switching)
a. Adjust screen brightness: Press the brightness + button to bring up the brightness adjustment menu, then press and hold the brightness + button to increase brightness, press and hold the brightness - button to decrease brightness
b. Switch signal source: Press the brightness - button to bring up the signal source menu, then press the brightness +/- to select the signal source, and press the power button to confirm the signal source
8. Power Key
9. Indicator Light
a. Blue: Connected to power with signal
b. Orange: Standby mode
10. Power Jack
11. Full-Featured USB-C port
12. DisplayPort Port
13. HDMI port
14. 3.5mm Audio Output
15. Cable Cover
2. Accessory List
1 x X3 Pro Smart Chip Stylus
1 x X3 Pro Slim Stylus
10 x X3 Pro Slim Stylus nibs
10 x X3 Pro Smart Chip Stylus Standard nibs
1 x Pen case with nibs (X3 Pro Slim Stylus nibs *4, X3 Pro Stylus felt nibs*4)
1 x Wireless Shortcut Remote and Bluetooth receiver
1 x Power adapter and power cord
1 x DisplayPort cable
1 x HDMI cable
1 x USB-C to USB-C cable
1 x USB-C to USB-A cable
1 x Glove
1 x Cleaning cloth
1 x Pen clip
1 x Pen case
1 x ACS02 Stand
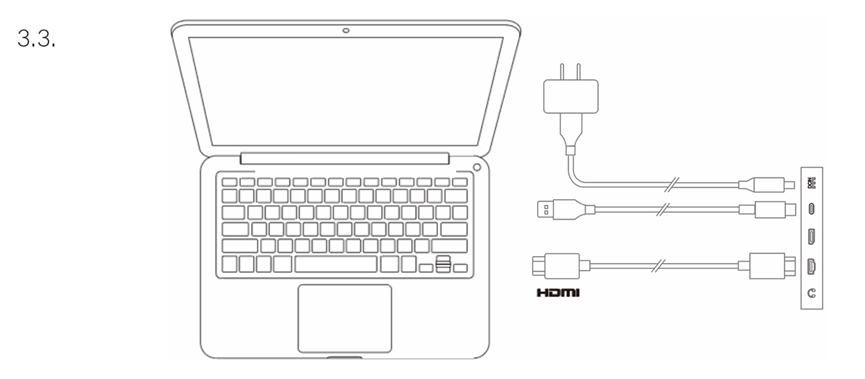
3. Product Connection
1. Carefully place the Artist Pro face down on a flat, clean surface.
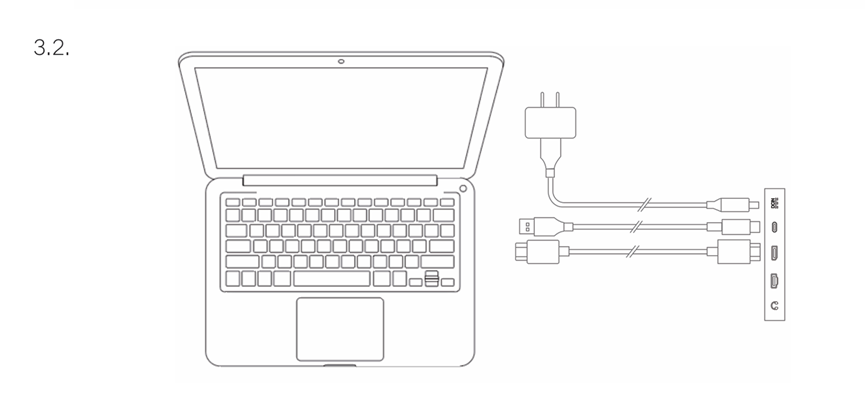
2. Use the power cord and adapter to connect your device to power
3. Determine which ports are applicable to connect your computer and device:
USB-C: Use the USB-C to USB-C cable to connect your computer and device
DisplayPort: Use the DisplayPort cable and USB-C to USB-A cable to connect your computer and device
HDMI: Use the HDMI cable and USB-C to USB-A cable to connect your computer and device
To ensure your device works properly, both video and data cables must be attached from your computer to the device. Connect the video cable through the video port on your computer, and connect the data cable through the USB port.
4. Once connected, you can close the cable cover

4. Connecting Android Phone or Tablet
1. Use the power cord and adapter to connect your device to power
2. Use the USB-C to USB-C cable to connect your Android device* and the drawing display
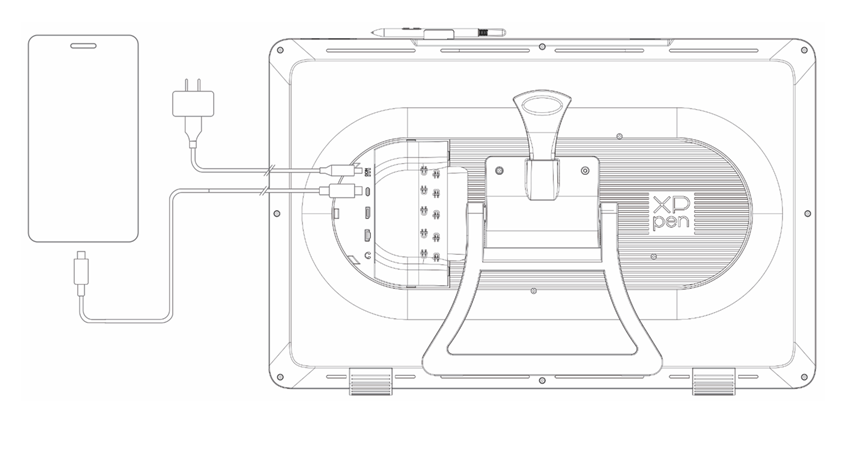
* For compatible phone models, please refer to the XPPen official website
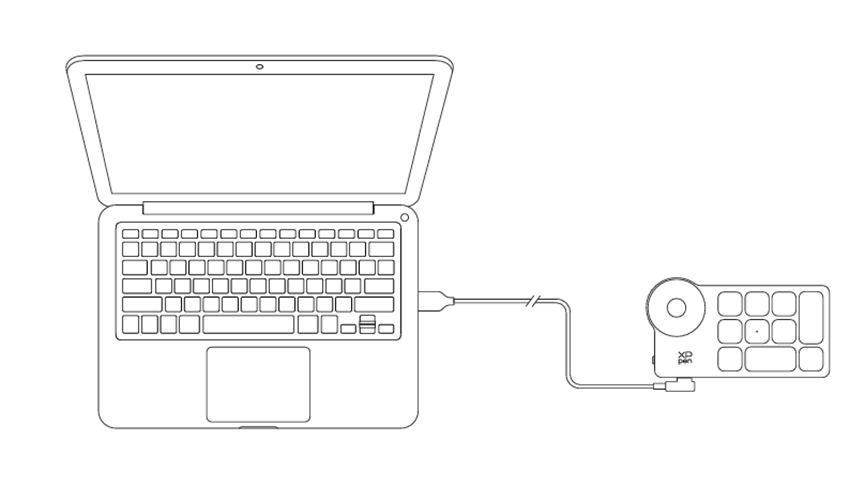
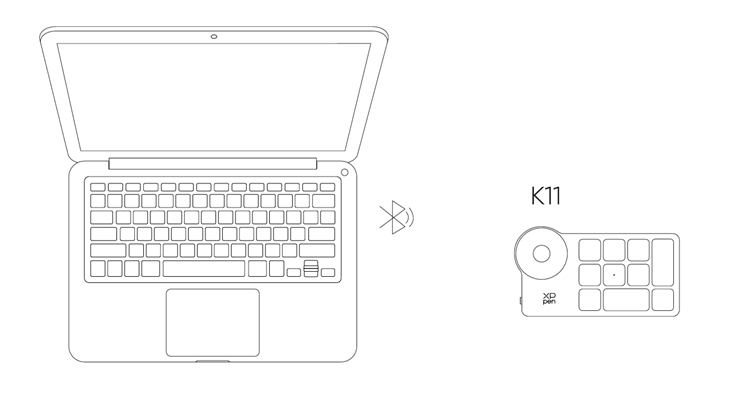
5. Wireless Shortcut Remote
1. Wired Connection: Use the USB-C to USB-A or USB-C to USB-C cable to connect your computer and the device.
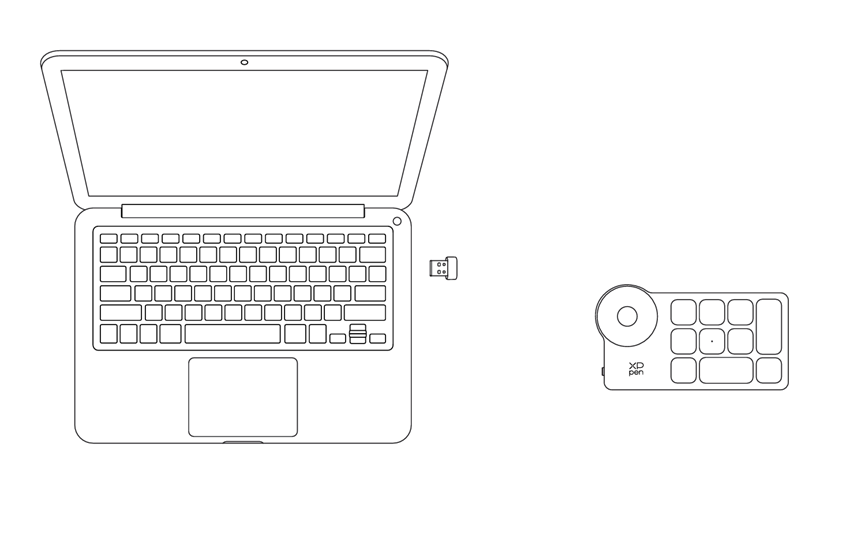
2. Bluetooth Receiver Connection: Insert the Bluetooth receiver into the computer, turn on the wireless shortcut remote power switch, the indicator light will be steady blue, and it will turn off after 30 seconds
3. Bluetooth Wireless Connection:
3.1 Turn on the wireless shortcut remote power switch, the indicator light will slowly flash blue, press and hold the K11 key for 6 seconds to enter pairing mode, the indicator light will flash blue quickly
3.2 Turn on the Bluetooth function on your computer, add a Bluetooth device, search for the device named "Shortcut Remote", click to complete Bluetooth pairing, the indicator light will be steady blue; it will turn off after 30 seconds
6. Compatibility
Drawing Display
Windows 7 or later
macOS 10.13 or later
Android 10.0 or later (USB3.1 DP1.2)
ChromeOS 88 or later
Linux
Shortcut Remote
Bluetooth receiver or wired connections:
Windows 7 (or later)
macOS10.12 (or later)
Linux
Direct Bluetooth connection:
Windows 10 (or later)
macOS10.12 (or later)
1. Driver Download
1. Make sure your drawing display is connected to your computer.
2. Visit the XPPen website (www.xp-pen.com), click on the Support section and then Download. Choose a product model and download the latest driver according to your computer system.
3. Follow the prompts to finish the driver installation.
2. Driver Installation
Notes:
1. Before installing the driver, please turn off all antivirus software and graphics software.
2. Uninstall drivers (if any) for other drawing displays before the installation.
3. Restart your computer after the installation is completed.
4. For the best performance for your device, we recommend you to install the latest driver.
Windows
Unzip file. Run the "exe" file as administrator, and follow the prompts to complete the installation.
macOS
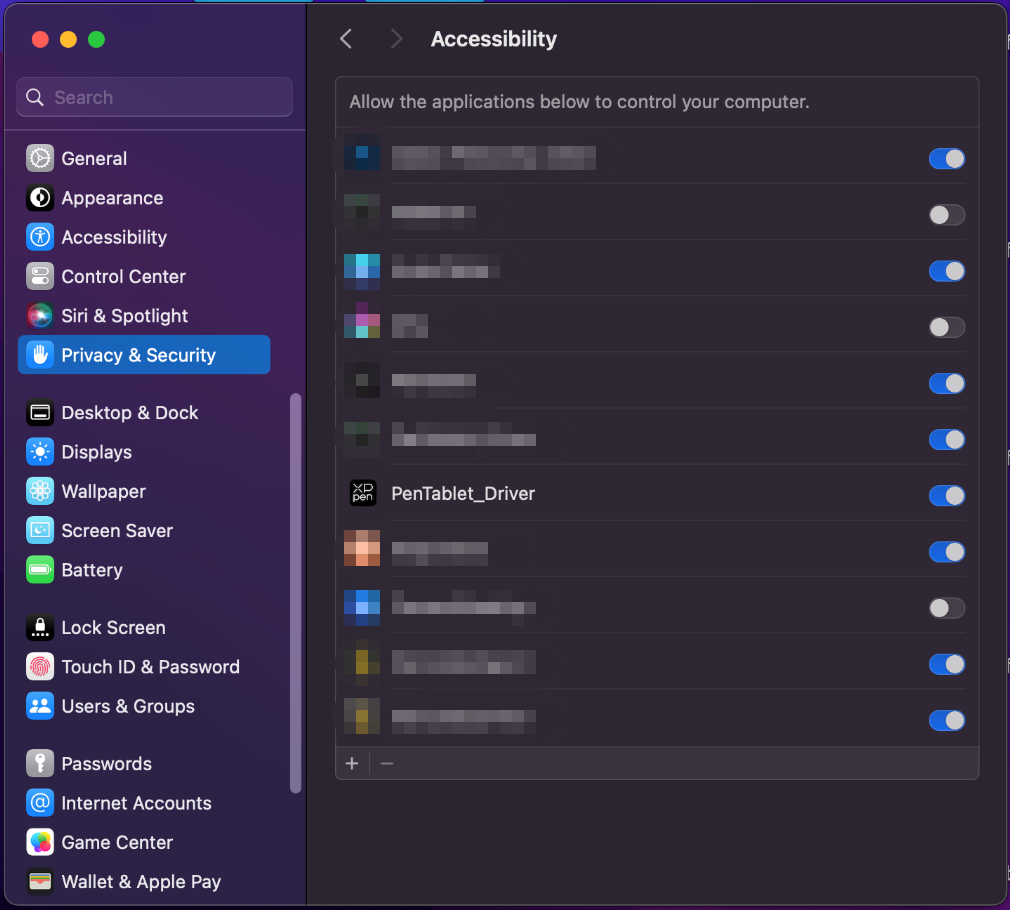
Unzip file, run the "pkg" file and follow the prompts to complete the installation. Go to System Settings -> Privacy & Security -> Accessibilities, please ensure that the PenTabletDriver option is checked; Otherwise, the device and driver may not function properly.
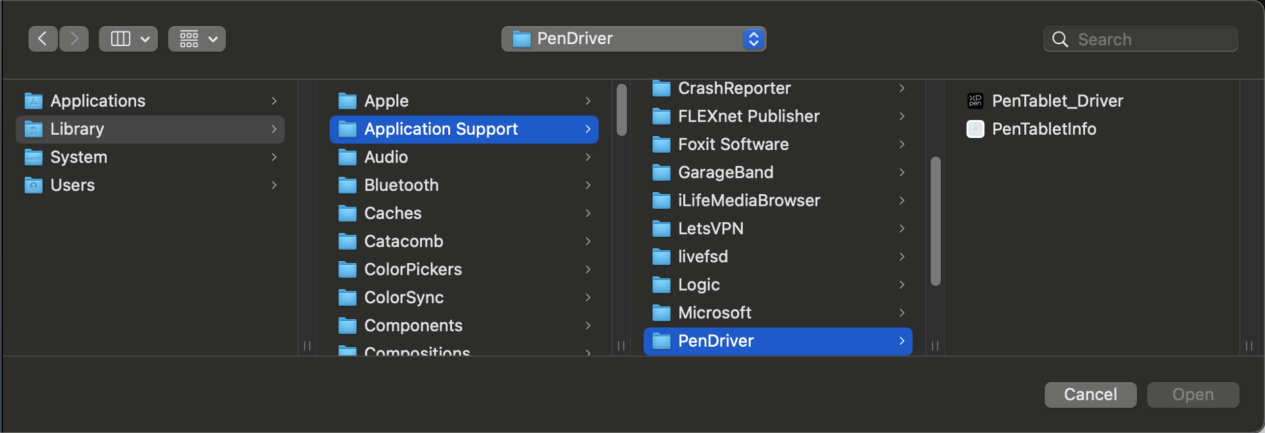
If there is no PenTablet_Driver on the list, go to resource Library -> Application Support -> PenDriver to add the driver manually.
Linux
Deb: Enter command “sudo dpkg -i”. Drag the installation file to the window and execute the command;
Rpm: Enter command “sudo rpm -i”. Drag the installation file to the window and execute the command;
Tag.gz: Unzip file. Enter command “sudo”. Drag “install.sh” to the window and execute command.
3. Driver Function Settings
Drawing Display
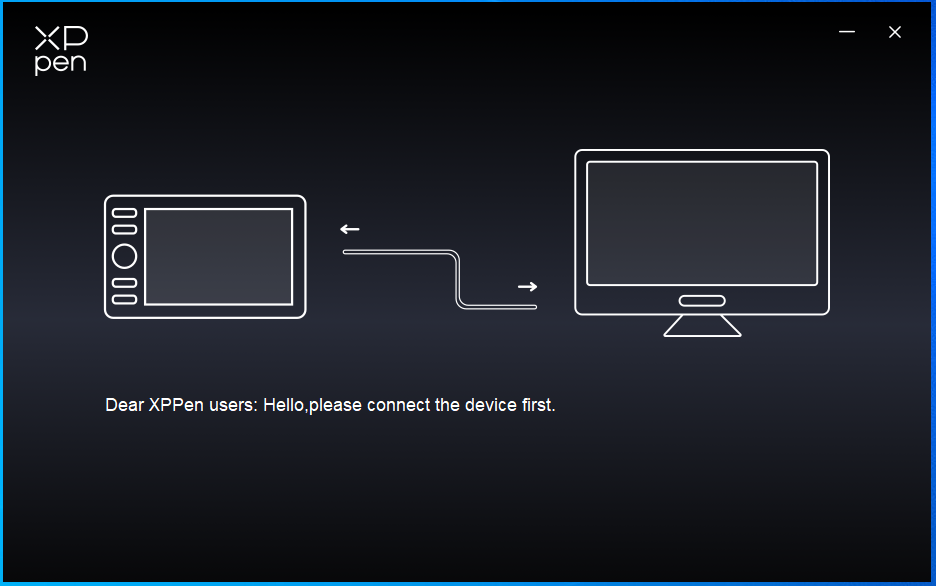
Device connection
If the device is not connected or the connection fails, you can see the following prompt. In this case, try to restart your computer or the driver, or contact our service staff for support.
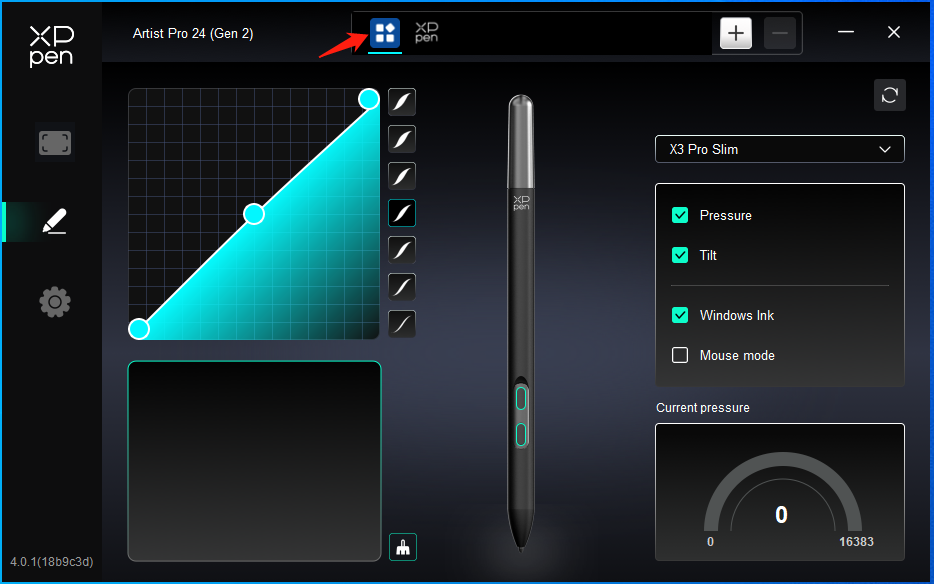
If the device is connected to your computer successfully, the device name will be displayed in the upper left corner of the driver.
You can connect to multiple devices via the driver at the same time. Customize a specific device's settings after switching to that device, and all changes made will only apply to that device.
Device Setting
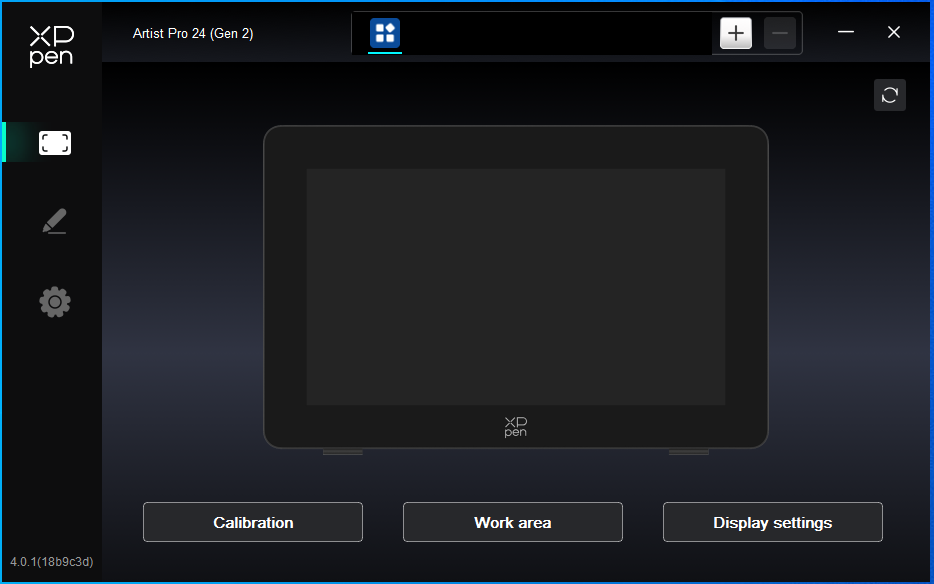
1) Calibration
Hold the stylus in your usual way and click the center of the red cross on the monitor to calibrate the offset between the stylus and the cursor.
2) Work Area
Define the mapping between the device's work area and the screen display area.
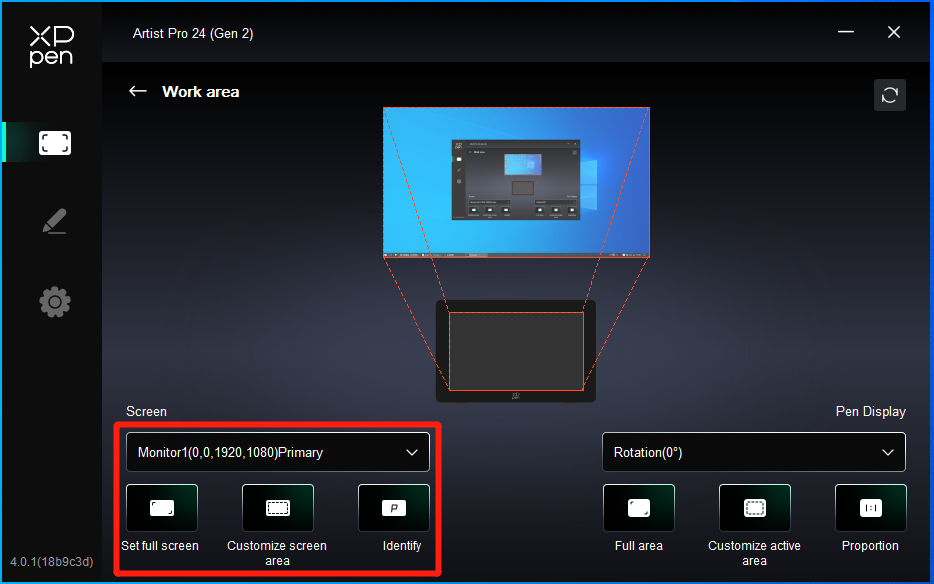
You can set the mapping between the display area of the current monitor and the device.
If multiple monitors are used in duplicate mode, the work area of the device will be mapped to all monitors. When the pen moves in the work area, the cursor on all monitors will move at the same time.
If multiple monitors are used in extend mode, go to monitor tabs to select one of the monitors that the work area of the device will be mapped to.
a. Screen
1. Set full screen: The whole area of the selected monitor;
2. Customize screen area:
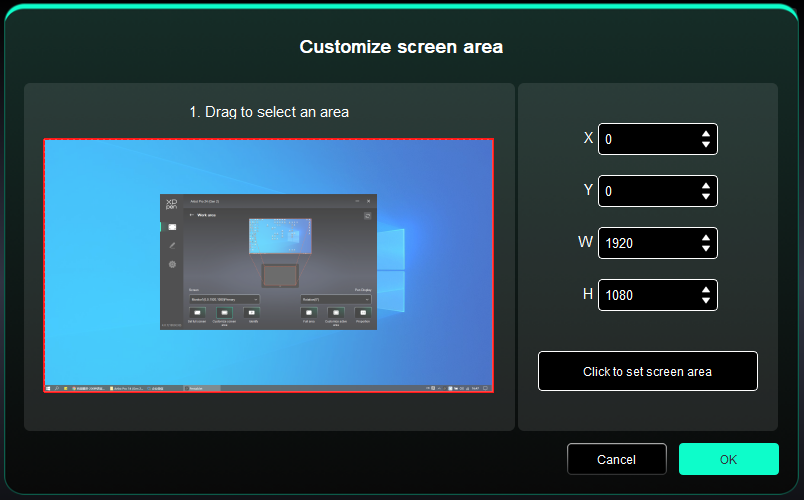
Drag to select an area: Drag the cursor from one point to another on the screen.
Coordinates: Manually enter coordinates in the corresponding input boxes for X, Y, W and H.
Click to set screen area: Click the upper left corner position and lower right corner position to select on the monitor.
Identify:
Identify all connected monitors. The numeric identifier will be displayed in the lower left corner of each monitor.
b. Pen Display
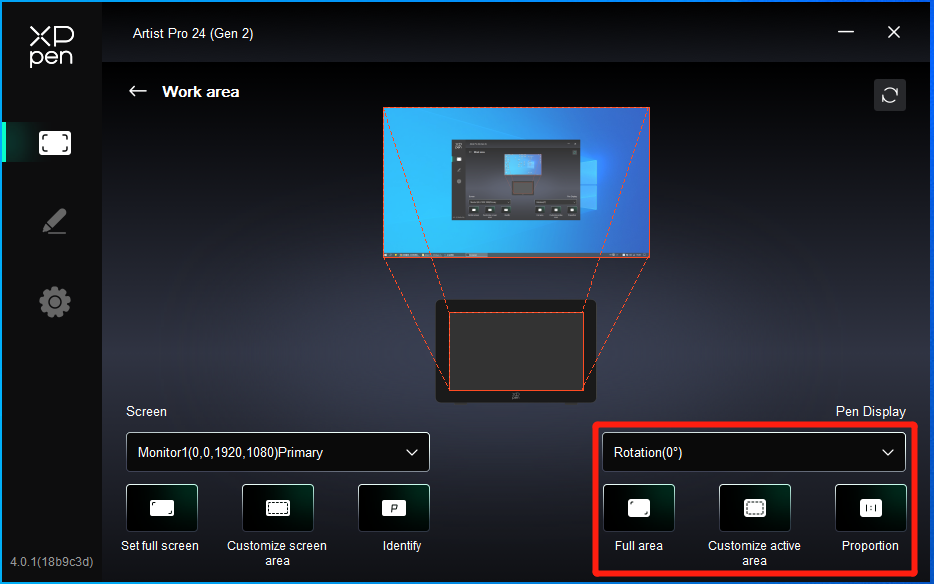
1. Full area: The whole work area of the device is available.
2. Customize active area:
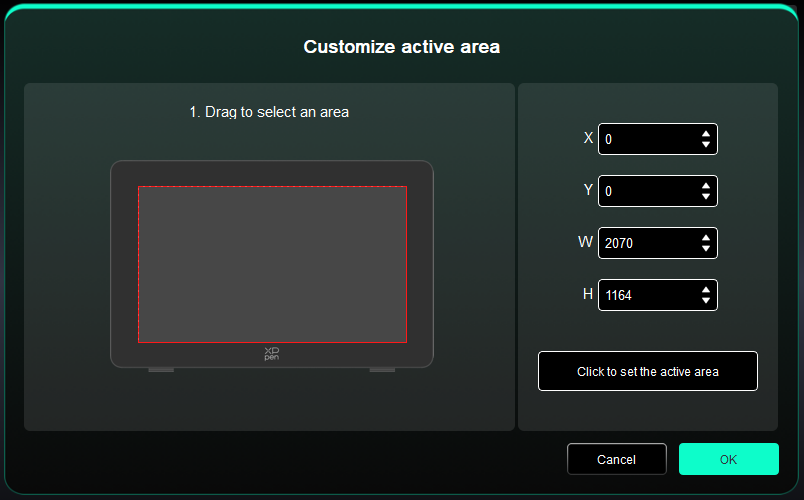
Drag to select an area: Drag the cursor from one point to another on the device.
Coordinates: Manually enter coordinates in the corresponding input boxes for X, Y, W and H.
Click to set active area: Use stylus to click the upper left corner position and lower right corner position on your device.
3. Proportion: Scale your device's work area and selected display area proportionately.
For example: If you draw a circle on the device after selecting proportions, a circle will appear on the screen. However, part of the work area may not be used. But if you don’t choose the proportion and draw a circle, the circle may change into an ellipse on the screen.
Rotation:
You can set the device to 0°, 90°, 180° and 270° clockwise for use.
Left-handed mode: Rotate 180°.
3) Display Setting
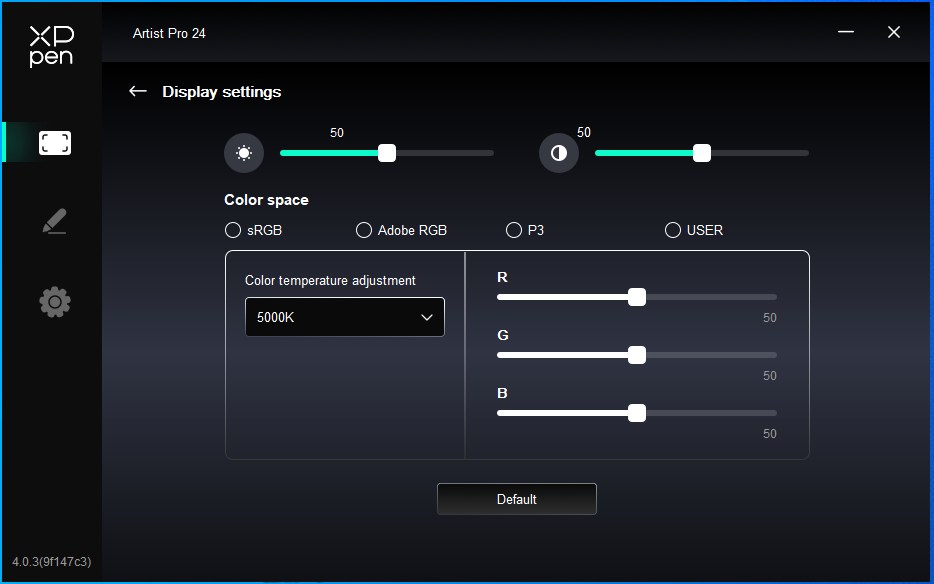
Brightness, Contrast: Slide the corresponding slider to adjust the brightness and contrast.
Color space: In the USER mode, the color space can be customized by adjusting the color temperature (the values of R, G, and B can also be adjusted when selecting USER mode in the color temperature).
This product has preset three color modes: sRGB, Adobe RGB and P3. All modes have completed accurate and strict color gamut limits and calibration. So you can use it directly without the ICC limit again.
If you want to configure ICC manually, please select User mode in the display setting option under the driver interface, and configure it under native color.
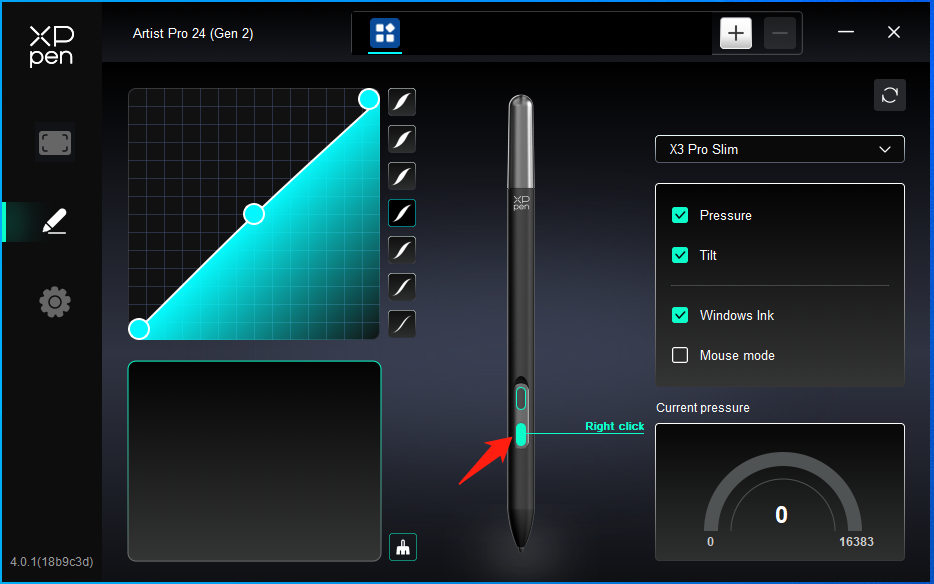
Pen settings
When the stylus is within the work area, the device will recognize the stylus and add it to the driver. The stylus should be compatible with the device.
Pen keys
Click on the pen keys position on the image to customize its function.
Shortcut keys:
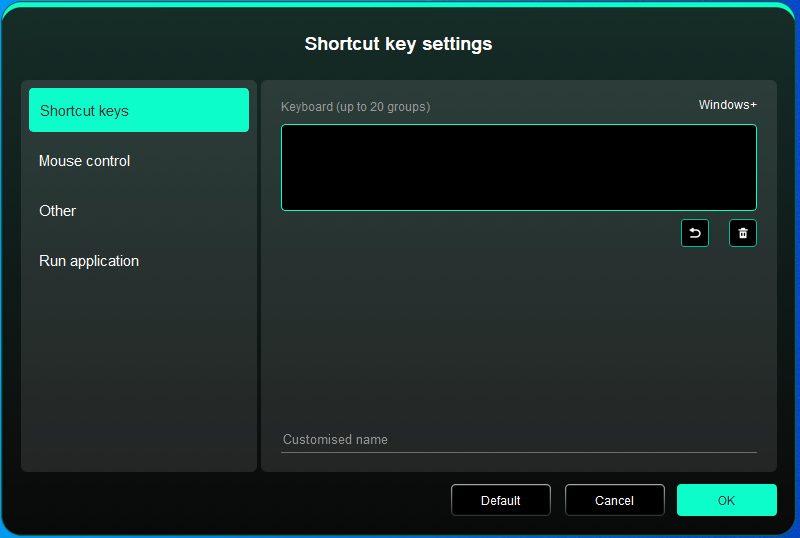
You can set keyboard shortcut. For example, set it to "Alt+A" in 3D MAX to use the alignment tool.
You can set multiple groups of shortcut keys. For example, type Ctrl+C/ Ctrl+V, and when you press the key, the shortcut key functions set will all run at once.
Windows (Command): You can add a combination key containing system key, for example: to enter Win (Cmd)+Shift+3, you can press Shift+3 and the driver will bring the system key automatically.
Customized name:
You can customize the name of the current settings.
Mouse Control:
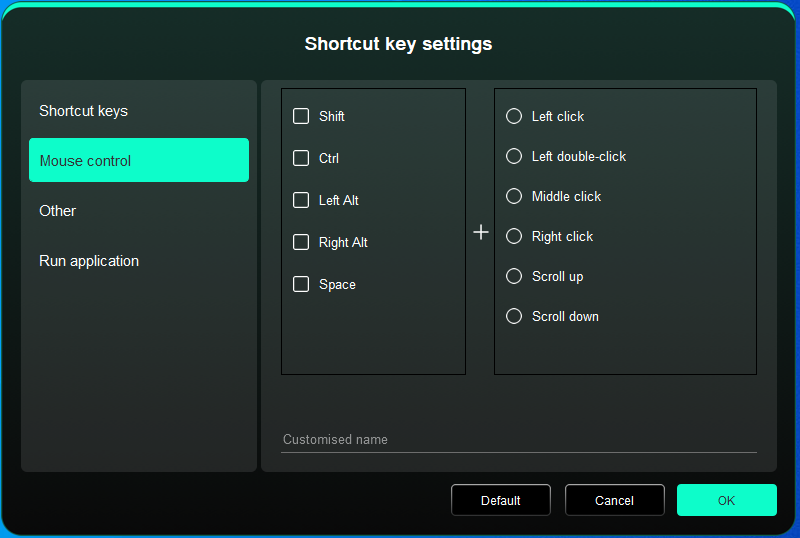
Set the key combination of mouse and keyboard. With the "Shift" and "Left Click" selected, the shortcut actions can be enabled in application that supports such key combinations.
Other:
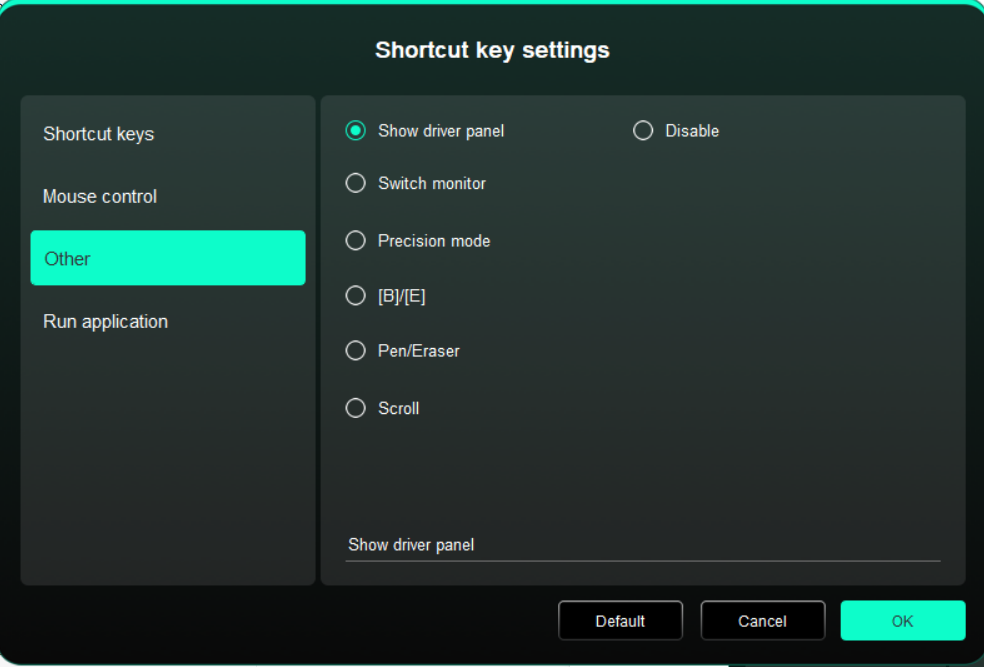
Show driver panel:Quickly displays the driver settings panel.
Switch monitor:When there are multiple display devices, you can make the cursor map to other display devices.
Precision mode:Limit the device’s work area to a certain area. This function may allow you to create more detailed drawings.
Scroll:Scrolling can be performed with the pen by pressing and holding the corresponding button.
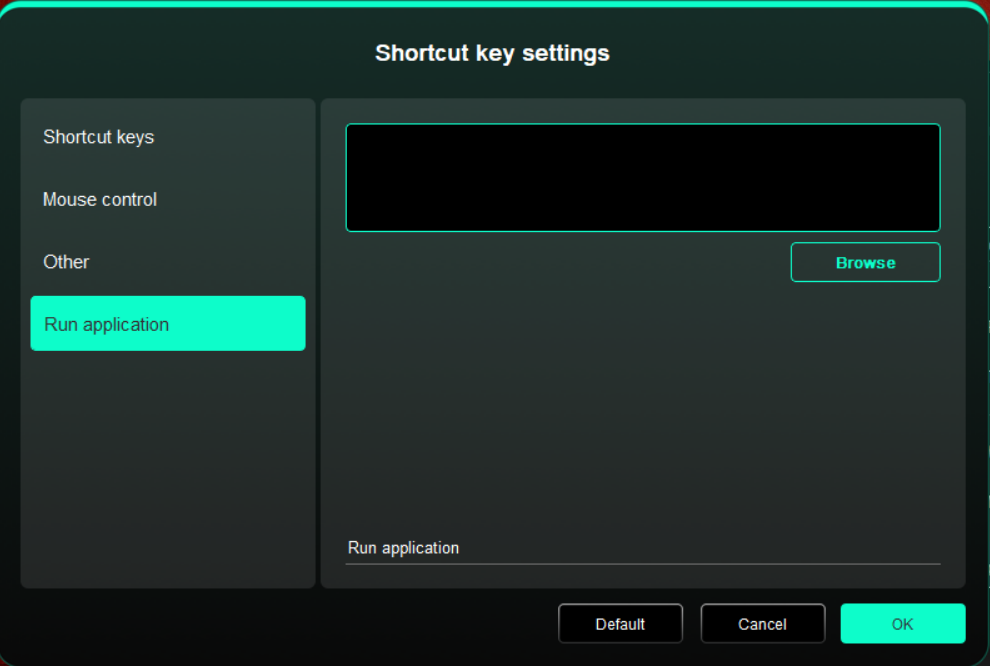
Run application:
Quickly launch the corresponding application via shortcut keys
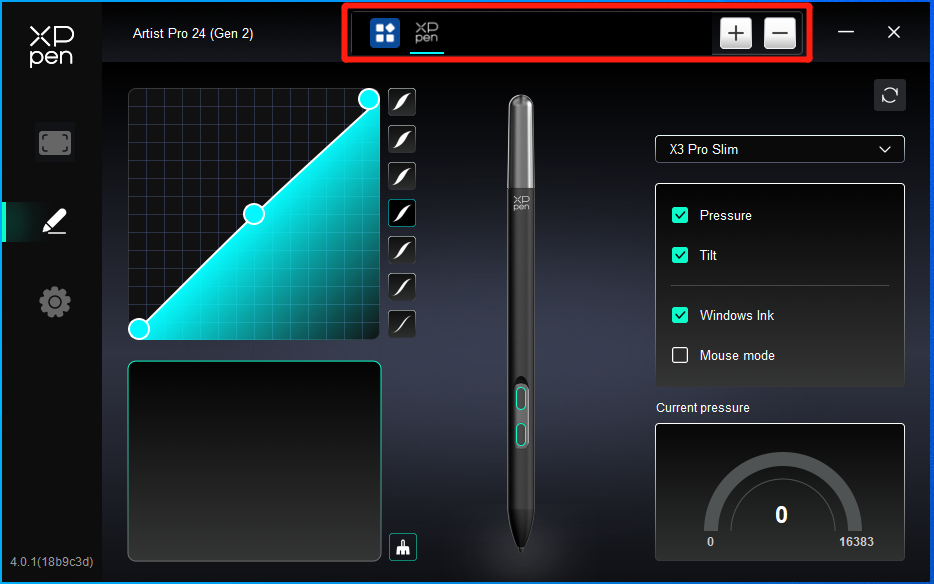
Pressure
By adjusting the pressure curve or selecting preset pressure options.
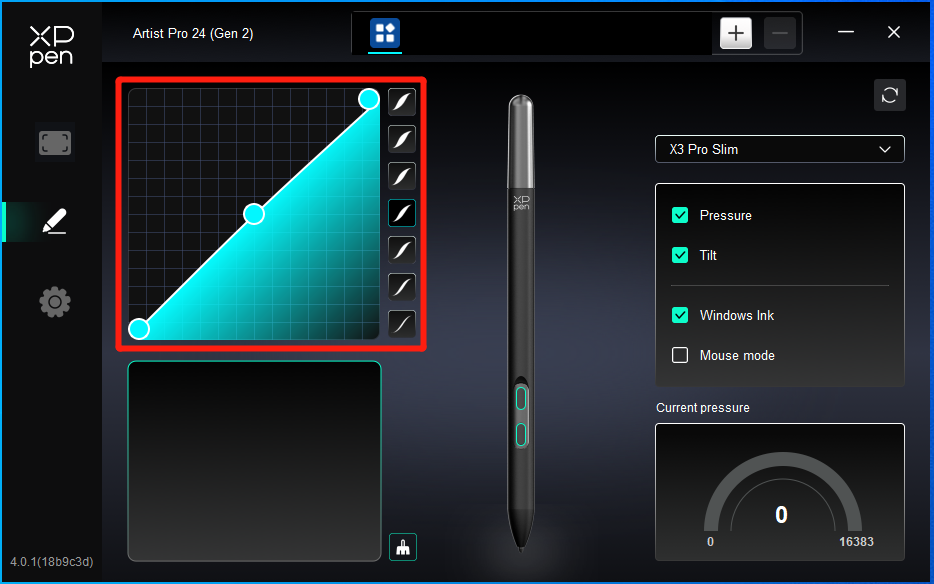
Current pressure:
Test the current pressure.
Pressure:
If closed, you will not feel the pressure when using the stylus.
others
Tilt:
If closed, this will disable the tilt effect of the stylus.
Windows Ink (for Windows only):
Windows supports handwriting function. If you need to use this function in Microsoft Office/Whiteboard or other software, please do not turn it off.
Mouse mode:
When you move your pen out of the work area, the cursor will stay where you leave, which is like operating a mouse. Select the mode and you can adjust the speed of the cursor on your device. If you do not select the mode, the pen mode applies by default.
Applications
Add an application from the list of applications, tick the application, and then customize pen keys functions.
For example, if you select an application and change its configuration, the change is valid only when you use the application. When you switch to another application, the driver will recognize it automatically. You can add up to 7 applications.
1. Click the + icon on the top right of the application bar to open the application list;
2. Select an application to be added from the running applications or click Browse to add from the installed applications;
3. Click "OK" to add the selected application;
4. Select an added application, and click the - icon on the top right of the application bar to delete the application.
If you select all other applications, it will apply to other uncustomized applications.
Driver settings
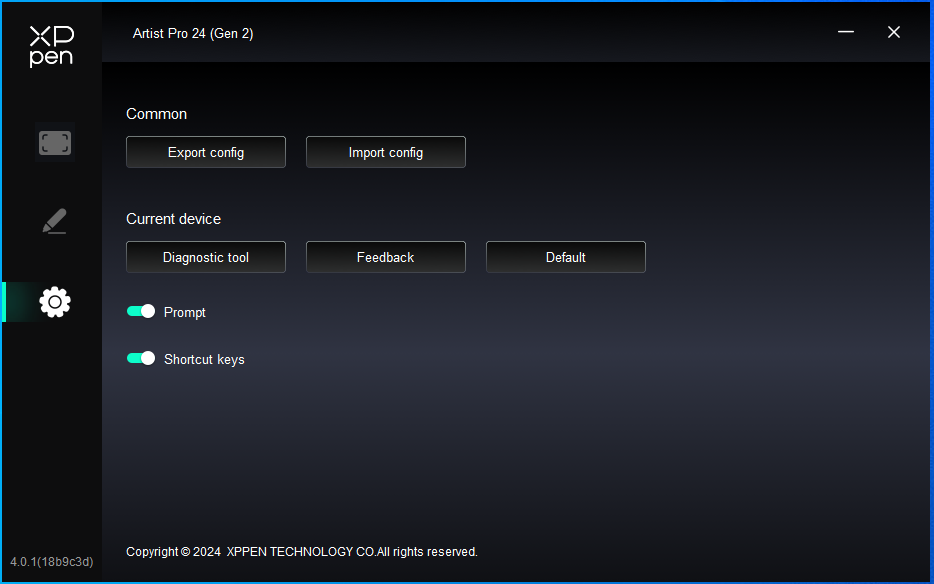
Import & Export config:
You can import/export configurations to read or save settings.
This function is available for only the same operating system.
Diagnostic tool:
You can use the diagnostic tool in case of any problems while using the driver.
Feedback:
If you have any questions or suggestions during the use of the driver, you can give us feedback through this page.
Shortcut keys:
If closed, disable the functions of all keys of the device.
Prompt:
If closed, when you press a key, no key prompt will be displayed at the bottom.
Wireless Shortcut Remote
Application
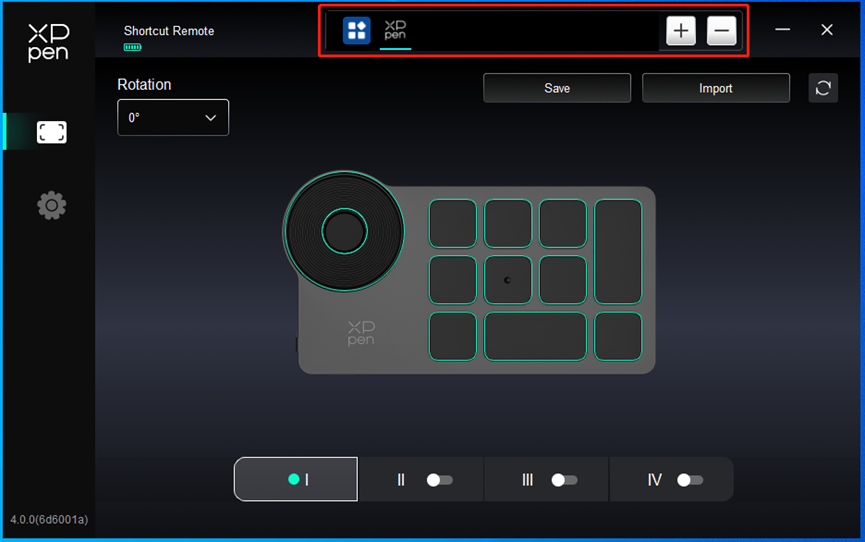
Roller
Through the key in the middle of the roller, you can switch between the functional groups of the roller.
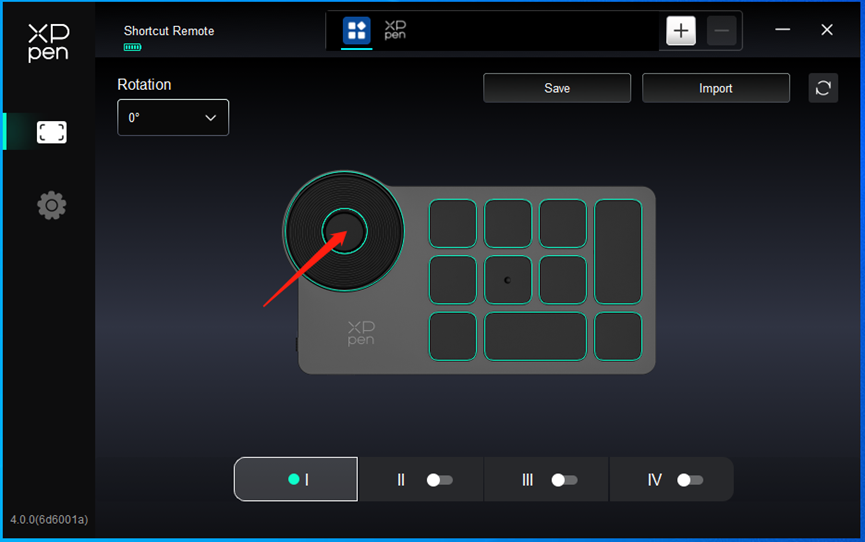
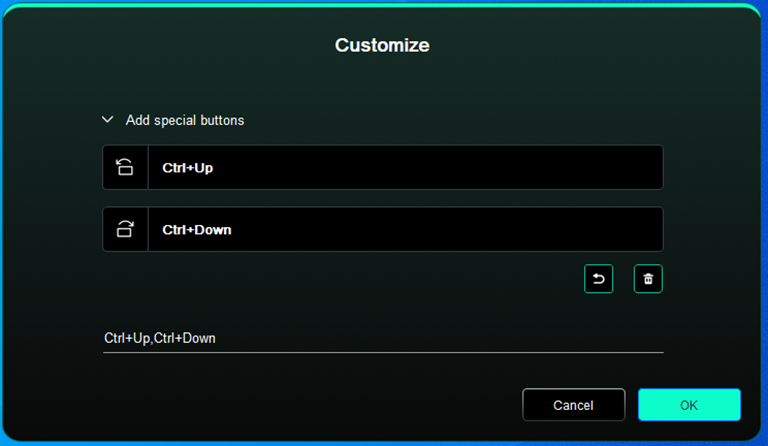
Customized:
Click on the position of the roller on the image, select "Customize" from the preset function drop-down menu, and customize the clockwise and counterclockwise functions of the roller by entering the desired keys or combination keys on the keyboard.
Import/Save
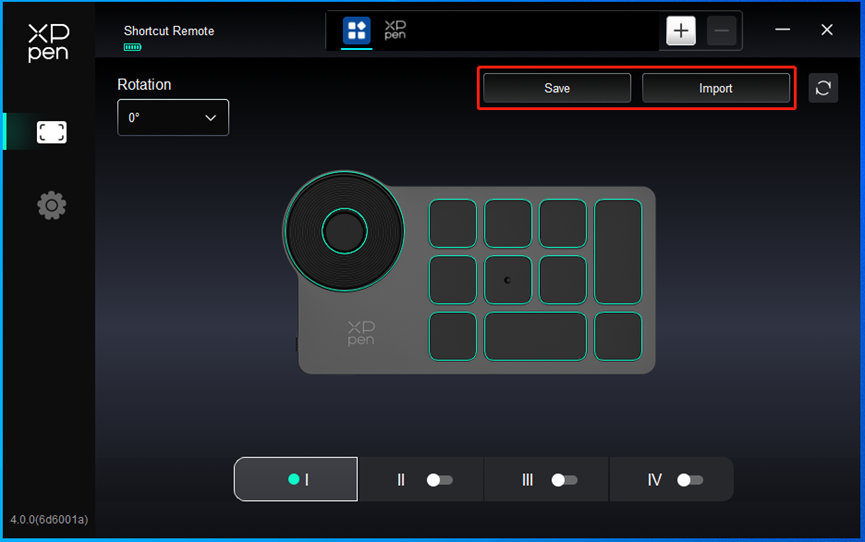
Save:
Save the configuration under the currently selected application to the device.
Import:
Import the configuration saved in the device into the driver of the selected application.
Note: please use the "Import" and "Save" functions in the case of wired connection. The configuration of "Import" and "Store" does not include the rotation information and is only valid under the same system.
Shortcut keys
The driver provides four groups of shortcut keys. The first group of shortcut keys is used by default (cannot be closed). Each group of keys can customize different functions. After enabling, you can switch between the opened groups through "key group switching" (the default is K1 key, which can be customized as other keys).
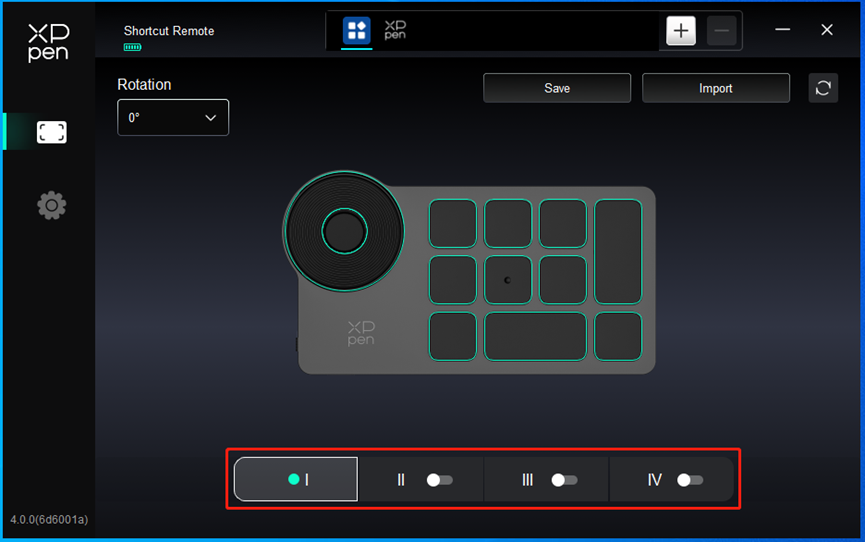
Customize:
Click on the corresponding button position on the device image to customize its function; Please refer to the previous text for settings or usage methods.
Set preview
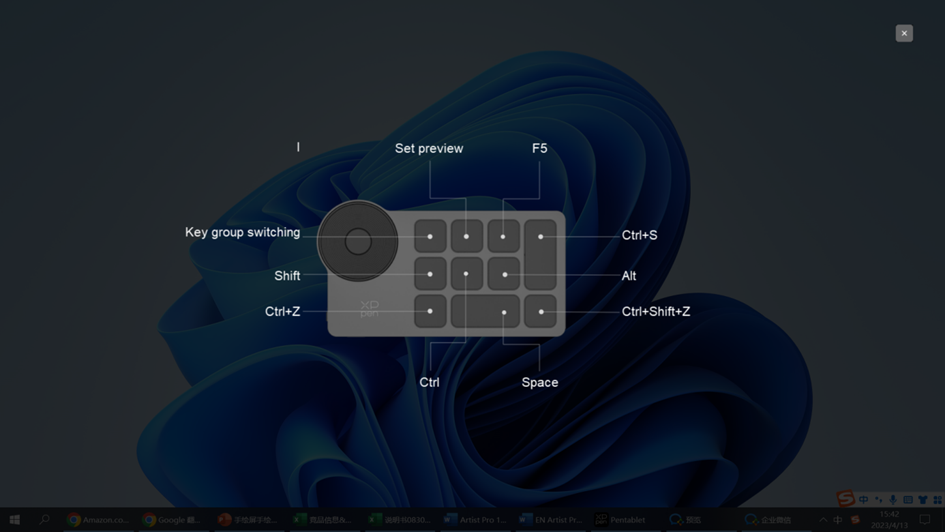
View the key group functions in use, if you select the key group that is not opened in the drive, the group I will be used by default. Click the close button on the upper right to close the window.
Driver Settings
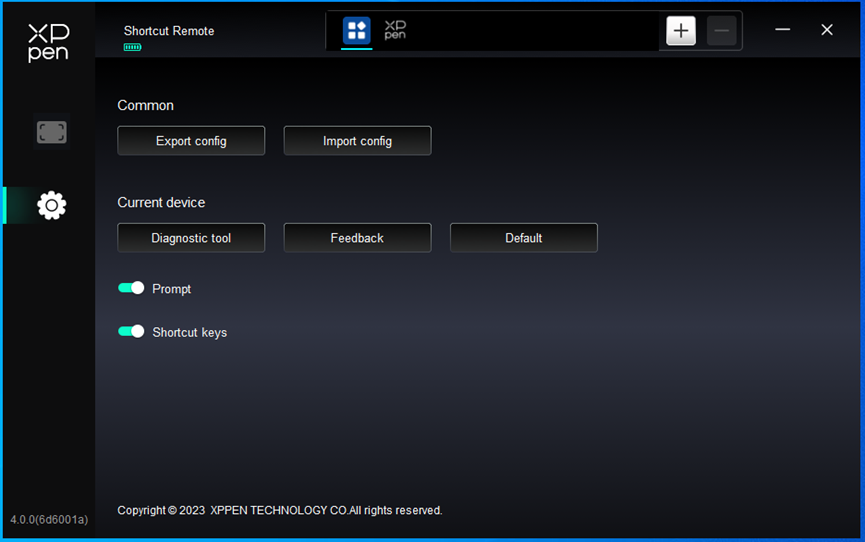
Import & export configuration:
You can import/export configurations to read or save their settings.
This function is available for only the same operating system.
Diagnostic tool:
If there is any problem while using the driver, you can use a diagnostic tool.
Prompt:
If closed, when you press a key, no key prompt will be displayed at the bottom of the screen.
Shortcut keys:
If closed, disable the functions of all keys of the device.
4. Driver Uninstallation
Windows
Go to Start -> Settings -> Apps -> Apps & Features, find "Pentablet" and then left click "Unload" as per prompts.waLinux
Deb: Enter command “sudo dpkg -r XPPenLinux” and execute the command;
Rpm: Enter command “sudo rpm -e XPPenLinux” and execute the command;
Tag.gz: Unzip file. Enter command “sudo”. Drag uninstall.sh to the window and execute command.
1. No display or black screen on a drawing display.
1) Check if the device is connected to power supply properly;
2) Check if the cable is connected properly;
3) Check if the power indicator is blue. If not, check the cable and restart the device;
4) If the signal is unstable, check if the cable port is stable.
2. Computer fails to recognize the device.
Check if your computer's USB port used works normally. If not, use another USB port
3. The Drawing Display cannot display 3840*2160 60Hz or 2560*1440 165Hz
1) Confirm whether the graphics card and ports on host PC are supported 3840*2160 60Hz or 2560*1440 165Hz;
2) When using the HDMI port, the product supports up to 2560*1440 144Hz.
4. Stylus does not work.
1) Make sure you are using the stylus that originally came with your device;
2) Make sure you installed the driver correctly, and check if the pen settings of the driver is normal.
5. The drawing software cannot sense the pen pressure while the cursor can move.
1) Check if the drawing software supports pen pressure;
2) Download the latest driver installation files from XPPen website, and check if the pen pressure is normal in the driver;
3) Before installing the driver, turn off your antivirus software and graphics software;
4) Uninstall drivers for other drawing displays before installation;
5) Restart your computer after the installation is completed;
6) If the pen pressure is normal in the driver (Windows: ensure Windows Ink is enabled in the pen settings of the driver), run the drawing software and test it again.
6. Cursor offsets.
1) Calibrate the pen with the driver.
7. Line latency during drawing with the software.
1) Check if the computer configuration (CPU&GPU) meets the recommended configuration requirements for the drawing software installed, and optimize related functions via settings according to the FAQs posted on the official website of the drawing software.

The terms HDMI, HDMI High-Definition Multimedia Interface, HDMI trade dress and the HDMI Logos are trademarks or registered trademarks of HDMI Licensing Administrator, Inc.
For Artist Pro 24 (Gen2)
This Class B digital apparatus complies with Canadian ICES-003.
Cet appareil numérique de la classe B est conforme à la norme NMB-003 du Canada.
For Wireless Shortcut Remote
Declaration of Conformity Hereby, [Hanvon Ugee Technology Co.,Ltd.] declares that the radio equipment type [ACK05-B] is in compliance with Directive 2014/53/ EU. The full text of the EU declaration of conformity is available at the following internet address: www.xp-pen.com/
Warning: Changes or modifications not expressly approved by the party responsible for compliance could void the user's authority to operate the equipment.
FCC NOTE: This equipment has been tested and found to comply with the limits for a Class B digital device, pursuant to part 15 of the FCC Rules. These limits are designed to provide reasonable protection against harmful interference in a residential installation. This equipment generates, uses and can radiate radio frequency energy and, if not installed and used in accordance with the instructions, may cause harmful interference to radio communications. However, there is no guarantee that interference will not occur in a particular installation. If this equipment does cause harmful interference to radio or television reception, which can be determined by turning the equipment off and on, the user is encouraged to try to correct the interference by one or more of the following measures:
—Reorient or relocate the receiving antenna. —Increase the separation between the equipment and receiver.
—Connect the equipment into an outlet on a circuit different from that to which the receiver is connected.
—Consult the dealer or an experienced radio/TV technician for help
RF warning statement:
The device has been evaluated to meet general RF exposure requirement. The device can be used in portable exposure condition without restriction.
This device complies with Industry Canada license-exempt RSS standard(s). Operation is subject to the following two conditions:
(1) this device may not cause interference;
(2) this device must accept any interference, including interference that may cause undesired operation of the device.
Le présent appareil est conforme aux CNR d'Industrie Canada applicables aux appareils radio exempts de licence. L'exploitation est autorisée aux deux conditions suivantes:
(1) l'appareil ne doit pas produire de brouillage ;
(2) l'utilisateur de l'appareil doit accepter tout brouillage radioélectrique subi, même si le brouillage est susceptible d'en compromettre le fonctionnement.
MODIFICATION: Any changes or modifications not expressly approved by the grantee of this device could void the user's authority to operate the device.
Toute modification non approuvé explicitement par le fournisseur de licence de l’appareil peut entraîer l’annulation du droit de l’utilisateur à utiliser l’appareil.
Operation Frequency: 2402-2480MHz
Max power:3.3dbm
Operating temperature:0~45℃
Address:2/F, West of 3/F, 4/F, No.4 Building, Fulongte Industrial Park, Huaxing Road, Langkou Community, Dalang Street, Longhua District, Shenzhen, Guangdong China