Artist Pro 22 (Gen 2) Drawing Display
Contents
Product Brief
Product Settings
FAQs
1. Product Overview

1. Display/Work Area
2. Pen Clip
3. Brightness Down
4. Brightness Up
5. Power Key
6. Power Indicator Light
a. Blue: When the drawing display is connected to the computer and the power supply is switched on, the indicator will be on.
b. Orange: When the power supply of the drawing display is turned on, but no signal is received from the computer.
c. Off: When the power supply of the drawing display is turned off.
7. Power jack
8. USB-C Port
9. HDMI Port
10. 3.5mm Audio Output
2. Accessories
Drawing display
X3 Pro Smart Chip Stylus
Pen clip
Power adapter and cable
HDMI cable
USB-C to USB-C cable
USB-C to USB-A cable
Cleaning cloth
Glove
Wireless Shortcut Remote
Pen Case
* The list is for illustrative purposes only. Please refer to the actual product.
3. Drawing Display Connection
1. Connect your drawing display to the power supply using the power cord and power adapter as shown below.
2. To ensure the proper functioning of the drawing display, it is essential that both the video signal and data signal are connected simultaneously. Please select the corresponding connection mode according to the USB port type of your computer:
a) Full-Featured USB-C:
The fully functional USB-C port supports the simultaneous transmission of both video and data signals. Therefore, you only need to connect the USB-C to USB-C cable to the USB-C port on your computer and the drawing display.

b) Non-full Featured USB:
As illustrated in the figure below, connect the HDMI cable to the HDMI port on your computer and the drawing display to transmit video signals. Additionally, connect either the USB-C to USB-A cable or the USB-C to USB-C cable to the USB port on your computer and the drawing display to transmit data signals.

4. Wireless Shortcut Remote Connection
4.1. Wired connection
Use a USB-C to USB-A or USB-C to USB-C cable to connect your computer to your device.

4.2. Bluetooth Receiver Connection
Plug the Bluetooth receiver into the computer and flip the power switch of the wireless keyboard. If the indicator light is blue and turns off after 30 seconds, the connection is successful.

4.3. Bluetooth Wireless Connection
1) Turn on the wireless shortcut remote power switch, the indicator light will slowly flash blue. Press and hold the K11 key for 6 seconds to enter pairing mode, the indicator light will flash blue quickly.
2) Enable the Bluetooth function on your computer, add a Bluetooth device, and search for the device named "Shortcut Remote". Click to complete the Bluetooth pairing. The indicator light will remain steady blue and will turn off after 30 seconds.

5. Compatibility
Drawing Display
Windows 7 or later
macOS 10.13 or later
ChromeOS 88 or later
Android 10.0 or later (USB3.1 DP1.2)
Linux
Wireless Shortcut Remote
1) Bluetooth Receiver or wired Connection:
Windows 7 (or later)
macOS 10.12 (or later)
Linux
2) Bluetooth Wireless Connection:
Windows 10 (or later)
macOS 10.12 (or later)
1. Driver Download
1. Make sure your drawing display is connected to your computer.
2. Visit the XPPen official website (www.xp-pen.com), click on the "Support" section and then download. Choose a product model and download the latest driver according to your computer system.
3. Open the driver and set Parameters and test product functionality.
2. Driver Installation
Notes:
1. Before installation, please turn off all anti-virus software and graphics software.
2. Uninstall drivers (if any) for other drawing displays before the installation.
3. Restart your computer after the installation is completed.
4. For the best performance for your device, we recommend you to install the latest driver.
a) Windows
Unzip file. Run the "exe" file as administrator, and follow the prompts to complete the installation.
b) Mac
Unzip file, run the "pkg" file and follow the prompts to complete the installation. Go to System Settings -> Privacy & Security -> Accessibilitiy, please ensure that the PenTabletDriver option is checked; Otherwise, the device and driver may not function properly.

If there is no PenTablet_Driver on the list, go to resource Library -> Application Support -> PenDriver to add the driver manually.

c) Linux
DEB: Enter command “sudo dpkg -i”. Drag the installation file to the window and execute the command;
RPM: Enter command “sudo rpm -i”. Drag the installation file to the window and execute the command;
Tag.gz: Unzip file. Enter command “sudo”. Drag “install.sh” to the window and execute command.
3. Driver Function Settings
3.1. Drawing Display
1. Device connection
Before using the device, ensure that it is successfully connected to your computer. If the device is connected to your computer successfully, the device name will be displayed in the upper left corner of the driver.

In particular, multiple devices can be connected to the same computer at the same time, and you can switch between devices in the upper left corner and customize the Settings, which will only apply to the currently selected device. To restore the default settings for the device, click the button located in the upper right corner.

If the device is not connected or the connection fails, you can see the following prompt. In this case, try to restart your computer or the driver, or contact our service staff for support.

2. Device Setting
Click the icons on the left menu bar to switch between drive functions. From top to bottom, the options are Device Settings, Pen Settings, and Drive Settings.

2.1. Calibration
Due to individual differences in stylus-holding habits and the angle at which the stylus is held, please use the stylus in your usual manner. To ensure that the product better fits your personal usage habits, click the center of the Red Cross on the device screen with the stylus to calibrate the offset between the stylus and the cursor.
2.2. Work Area
Define the mapping between the device's work area and the screen display area.
Screen
You can set the mapping between the display area of the current monitor and the device.
a) If multiple monitors are used in duplicate mode, the work area of the device will be mapped to all monitors. When the pen moves in the work area, the cursor on all monitors will move at the same time.
b) If multiple monitors are used in extend mode, go to monitor tabs to select one of the monitors that the work area of the device will be mapped to.

Set the mapped area of the monitor:
a) Set full screen: The whole area of the selected monitor.
b) Customize screen area:
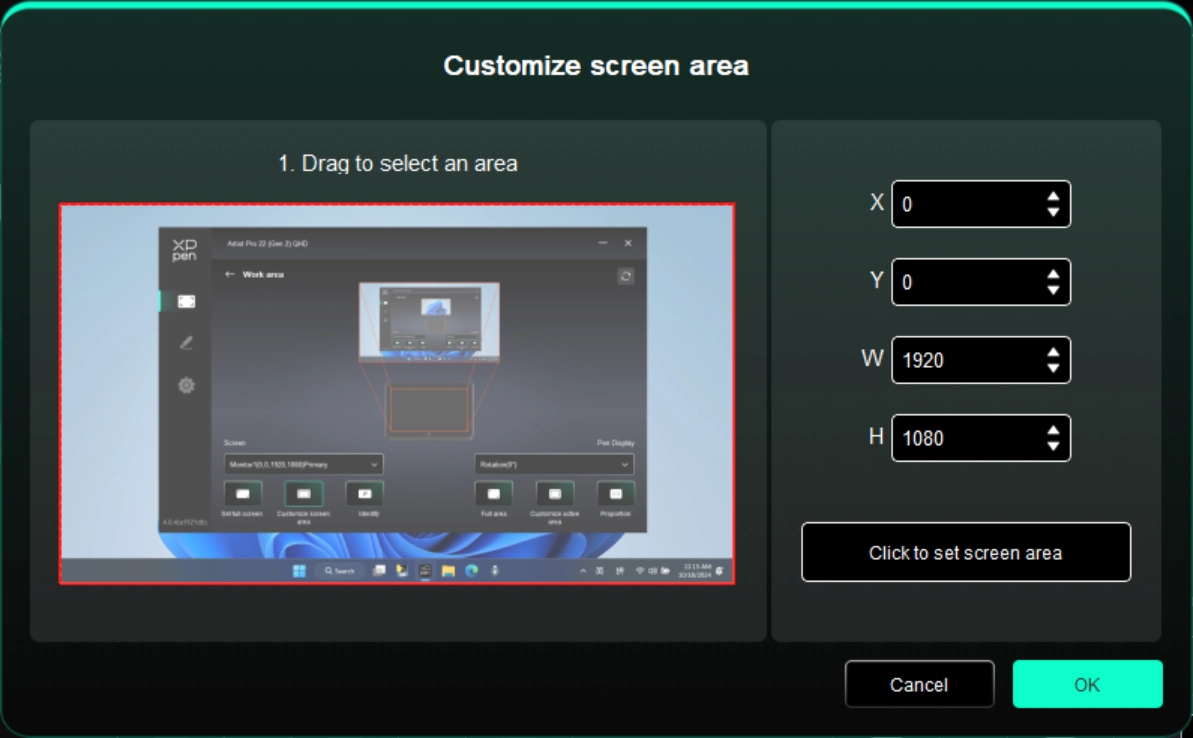
Drag to select an area: Drag the cursor from one point to another on the screen.
Coordinates: Manually enter coordinates in the corresponding input boxes for X, Y, W and H.
Click to set screen area: Click the upper left corner position and lower right corner position to select on the monitor.
c) Identify:
Identify all connected monitors. The numeric identifier will be displayed in the lower left corner of each monitor.
Pen Display
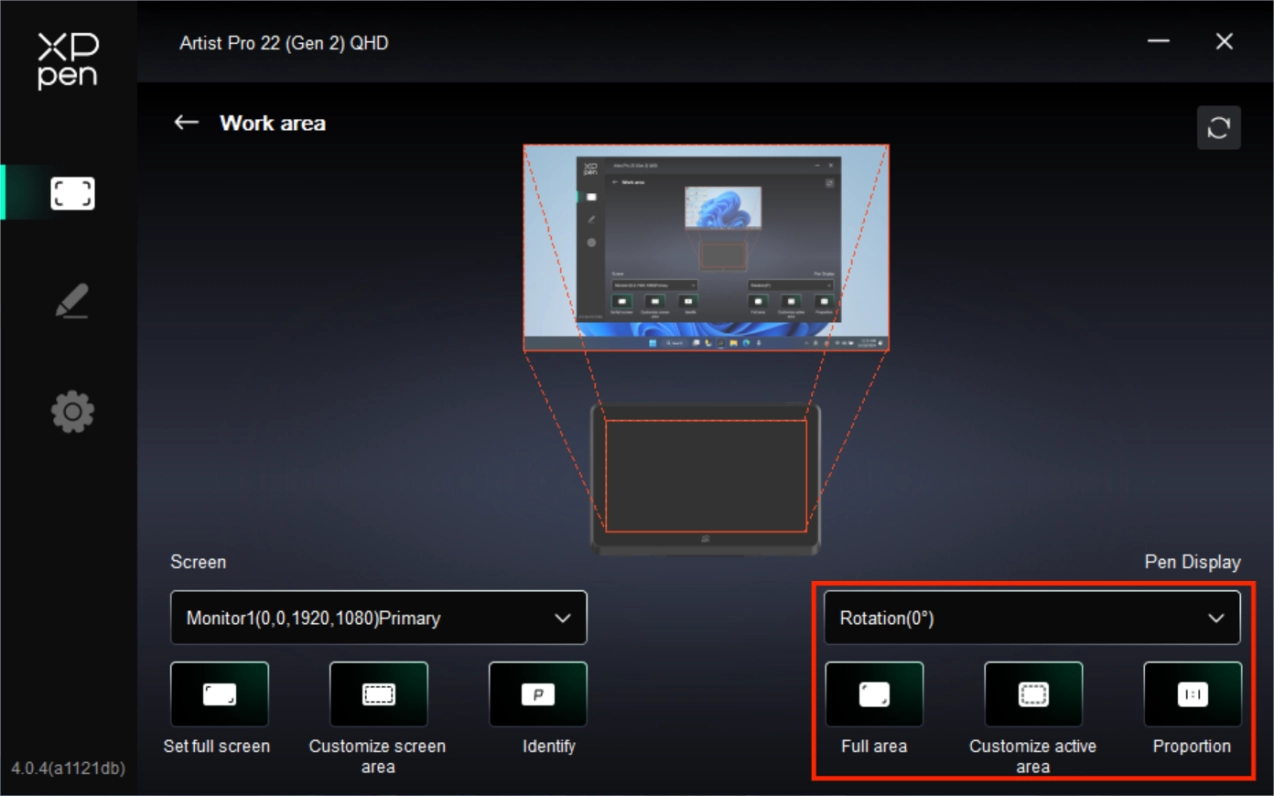
Set the device working area:
a) Full area: The whole work area of the device is available.
b) Customize active area:

Drag to select an area: Drag the cursor from one point to another on the device.
Coordinates: Manually enter coordinates in the corresponding input boxes for X, Y, W and H.
Click to set active area: Use stylus to click the upper left corner position and lower right corner position on your device.
c) Proportion: Scale your device's work area and selected display area proportionately.
If you draw a circle on the device after selecting proportions, a circle will appear on the screen. However, part of the work area may not be used. But if you don’t choose the proportion and draw a circle, the circle may change into an ellipse on the screen.
Rotation:
You can set the device to 0°, 90°, 180° and 270° clockwise for use.
Left-handed mode: Rotate 180°.
2.3. Display Settings
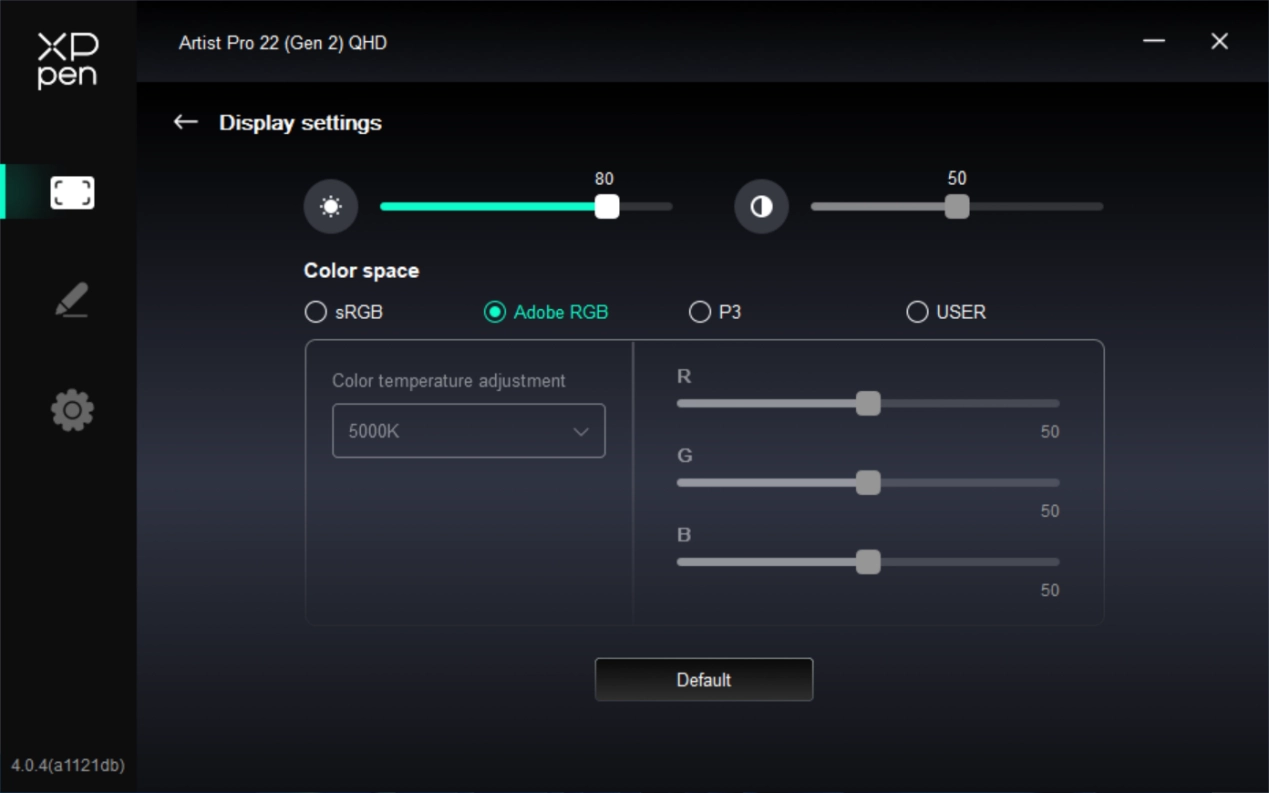
Brightness, Contrast
Slide the corresponding slider to adjust the brightness and contrast.
Color space
This product has preset three color modes: sRGB, Adobe RGB and P3. All modes have been completed accurate and strict color gamut limits and calibration. So, you can use it directly without the ICC limit again.
If you want to configure ICC manually, you can select User mode in the display setting option under the driver interface, and configure it under native color.
In the USER mode, the color space can be customized by adjusting the color temperature (the values of R, G, and B can also be adjusted when selecting USER mode in the color temperature).
3. Pen Settings

When the stylus is within the work area, the device will recognize the stylus and add it to the driver. The stylus should be compatible with the device.
You can click the drop-down menu for the stylus name on the right and select the corresponding stylus to configure the Settings. When you use the stylus, the driver will automatically switch to the stylus's custom Settings.
3.1. Pen Keys

Click on the pen keys position on the image and open the hotkey setting interface, then you can customize the function Settings.
Shortcut Keys
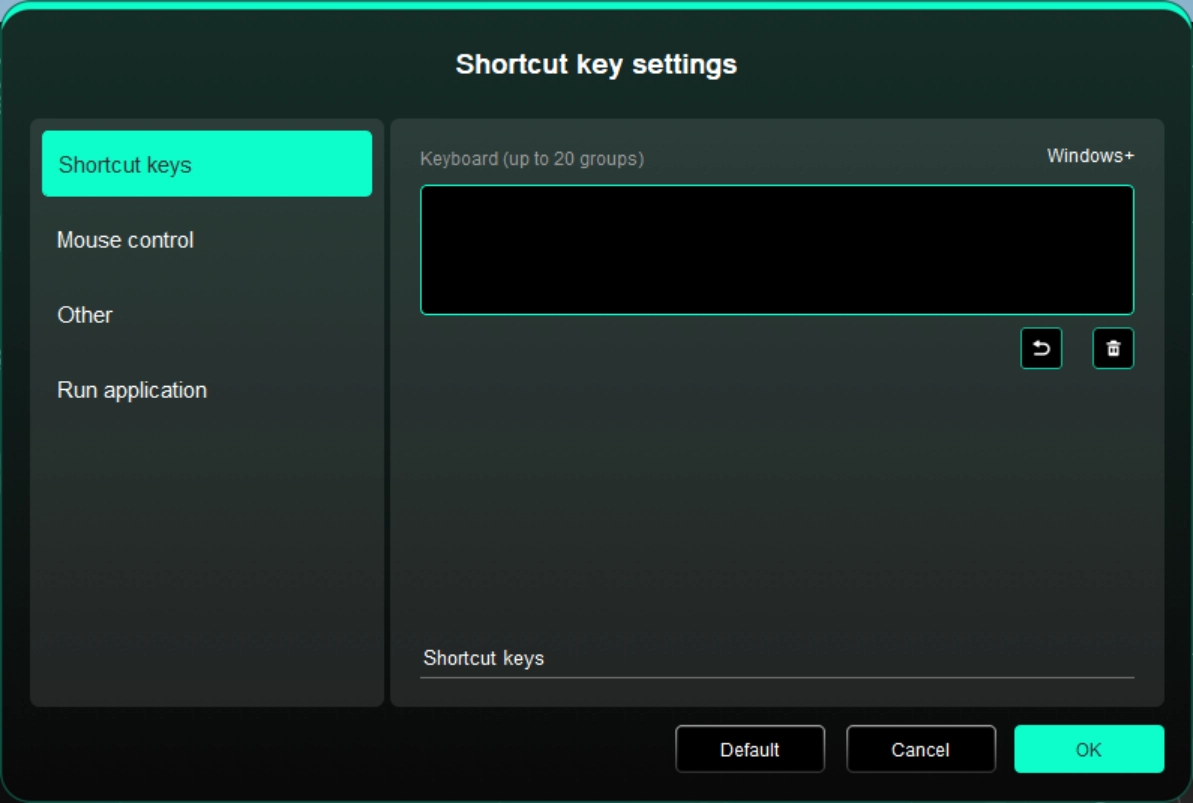
You can set the current key to the common keyboard shortcut under the application of your choice: For example, set it as Alt+A in 3D MAX to use the alignment tool can be used.
a) Multiple shortcuts can be set with the same key: For example, type Ctrl+C/ Ctrl+V, and when you press the key, the shortcut key functions set will all run at once.
b) When adding a key combination containing "Windows", use "Windows+" in the upper right corner instead of the system key on the keyboard: For example, if you want to type "Win(Cmd)+ Shift+3", just click "Windows+" in the upper right corner and then press "Shift+3" on the keyboard.
c) Customized name: In the lower part of the screen, you can customize the name of the current settings.
Mouse Control
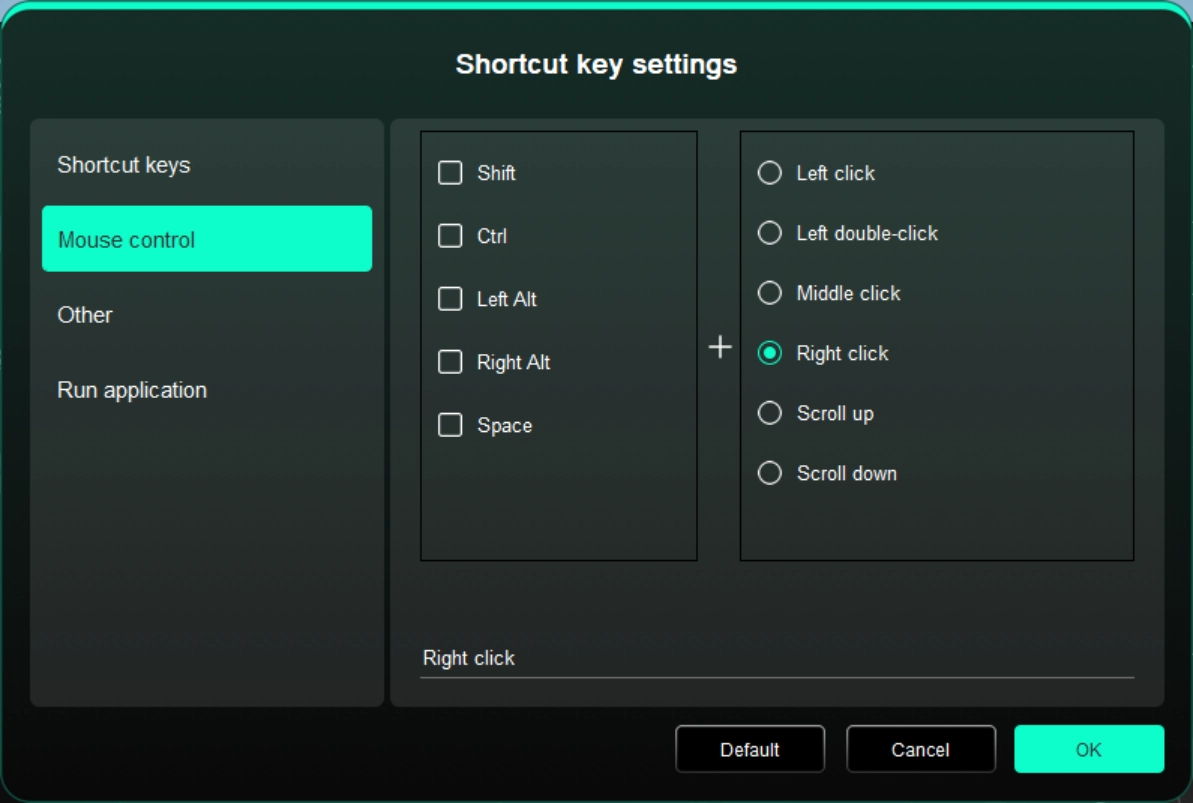
Set the key combination of mouse and keyboard. With the "Shift" and "Left Click" selected, the shortcut actions can be enabled in application that supports such key combinations.
Other
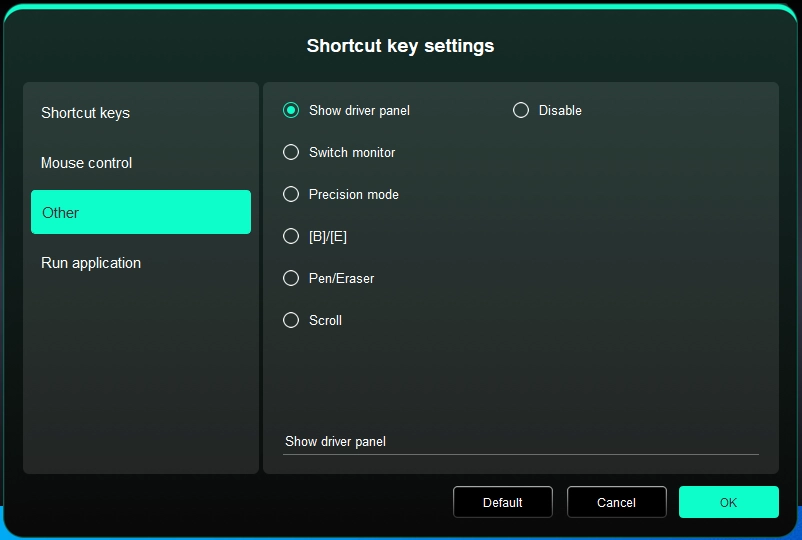
The current key can be set to other shortcut functions besides keyboard shortcuts and mouse:
Show Driver Panel: Displays the driver Settings panel quickly.
Switch Monitor: When there are multiple display devices, you can make the cursor map to other display devices.
Precision Mode: Limit the device's work area to a certain area. This function may allow you to create more detailed drawings.
[B]/[E]: Function switching between pen and eraser for very few applications.
Pen/Eraser: Function switching between brushes and eraser for most applications.
Scroll: Scrolling can be performed with the pen by pressing and holding the corresponding button.
Disable: No function will be triggered when the key is pressed.
Run application
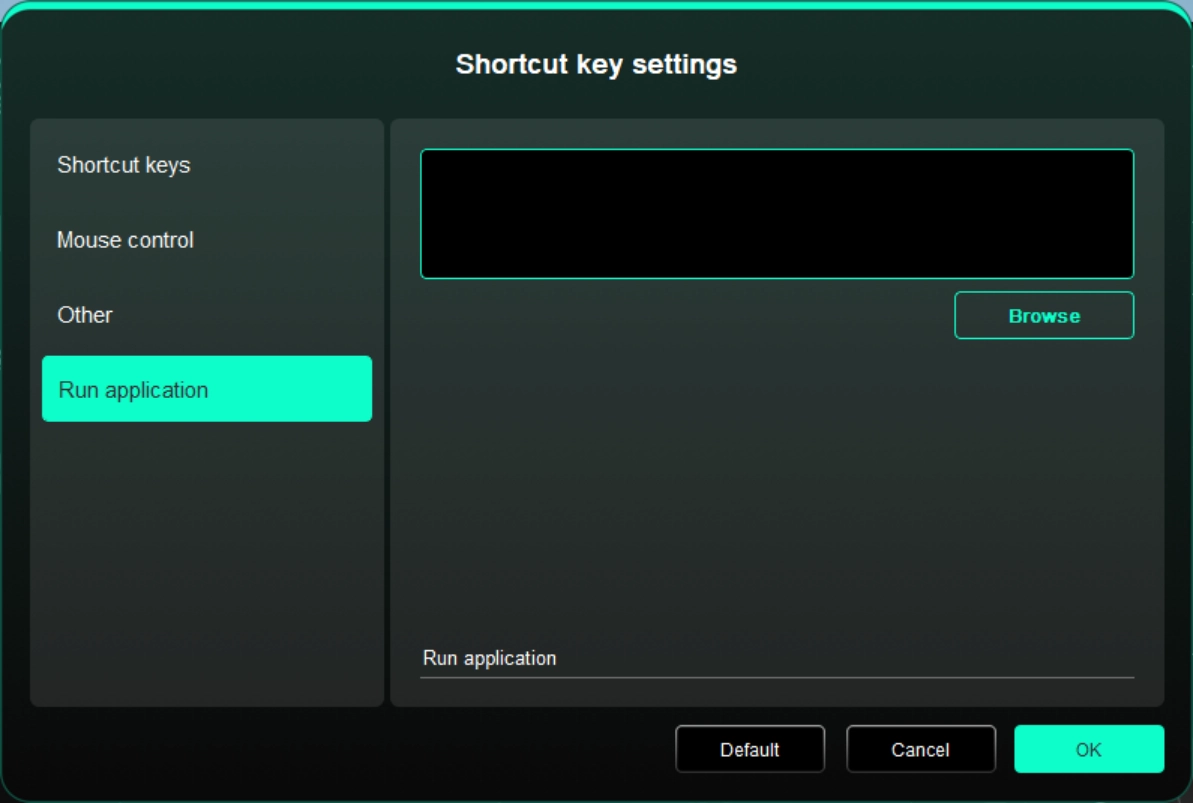
You can quickly launch the corresponding application through the shortcut key: Click Browse and select the required application, and press the key to quickly open the application.
3.2. Pressure
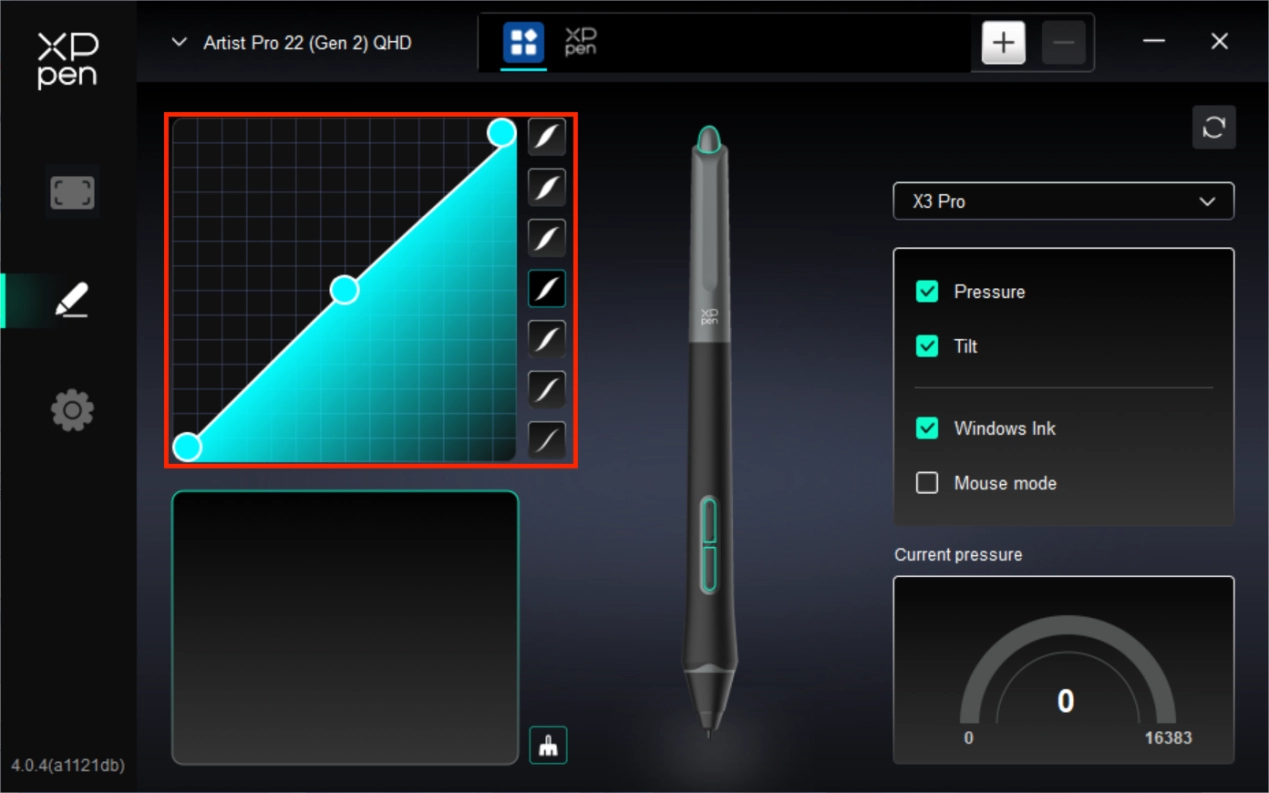
Pressure Curve
You can adjust the pressure manually by adjusting the Pressure Curve or by clicking on Pressure Preset Options in the right column.
You can use the stylus to draw freely on the drawing board at the bottom left, helping you feel the brush effect of the preset pressure more intuitively.
Current Pressure
Test the specific value of the pressure you generate when using the stylus currently.
Pressure
If closed, you will not feel the pressure when using the stylus. When you use the stylus, the brush effect will not change because of the pressure level.
Tilt
If closed, this will disable the tilt effect of the stylus.
3.3. Other
Windows Ink (for Windows only)
If your main use of the device is painting, please do not turn it off.
If you need to use this function in Microsoft Office/Whiteboard or other software, please do not turn it off.
Mouse Mode
In this mode, the stylus operates like a mouse, that is, when you lift the stylus, the cursor stays where it was when the stylus was lifted.
If it is selected, you can adjust the speed of moving the cursor on the device.
If this parameter is not selected, pen mode is used by default.
4. Application
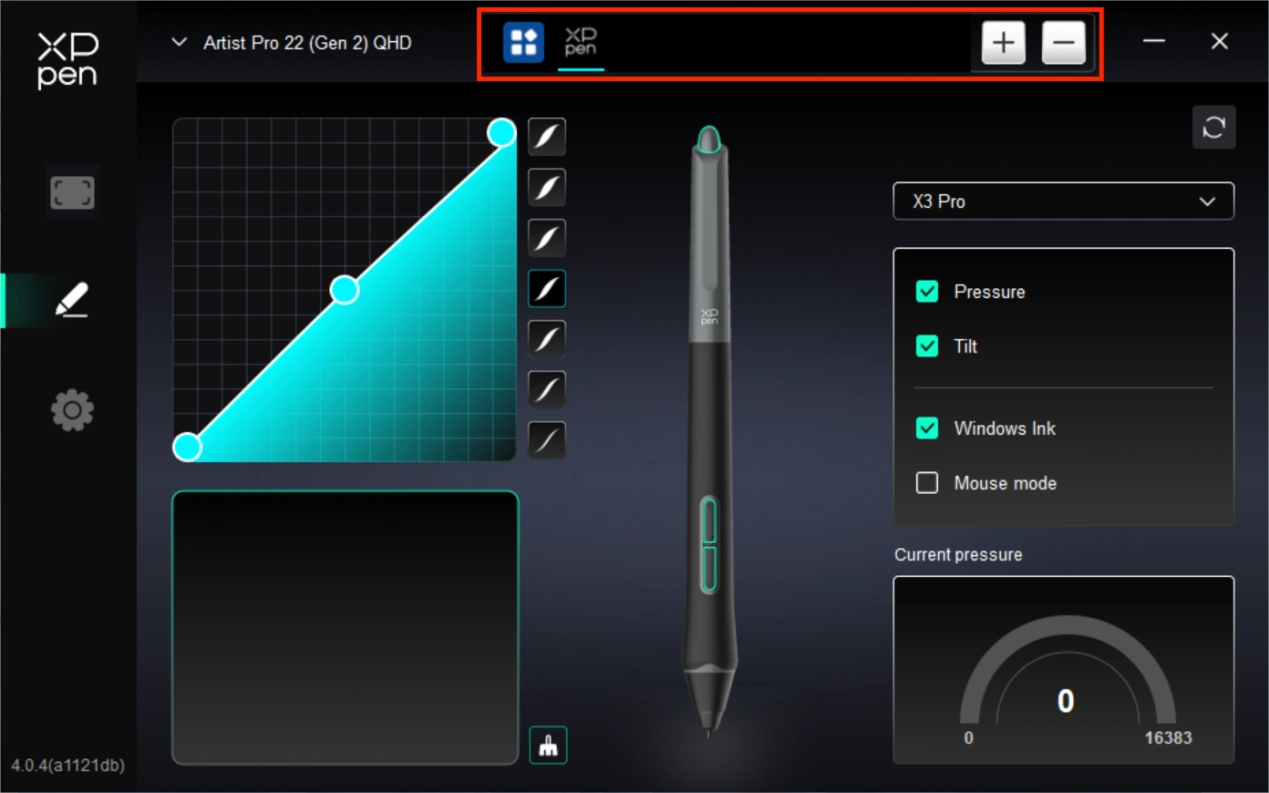
You can add up to 7 applications from the application list above as needed. The specific steps for adding are as follows:
1. Click the + icon on the top right of the application bar to open the application list;
2. Select an application to be added from the running applications or click Browse to add from the installed applications;
3. Click "OK" to add the selected application;
4. Select an added application, and click the - icon on the top right of the application bar to delete the application.
Tick one of the applications, then you can customize its pen key functions. The change is valid only when you use the application. When switching between different applications, the driver will automatically recognize and switch to the corresponding Settings.
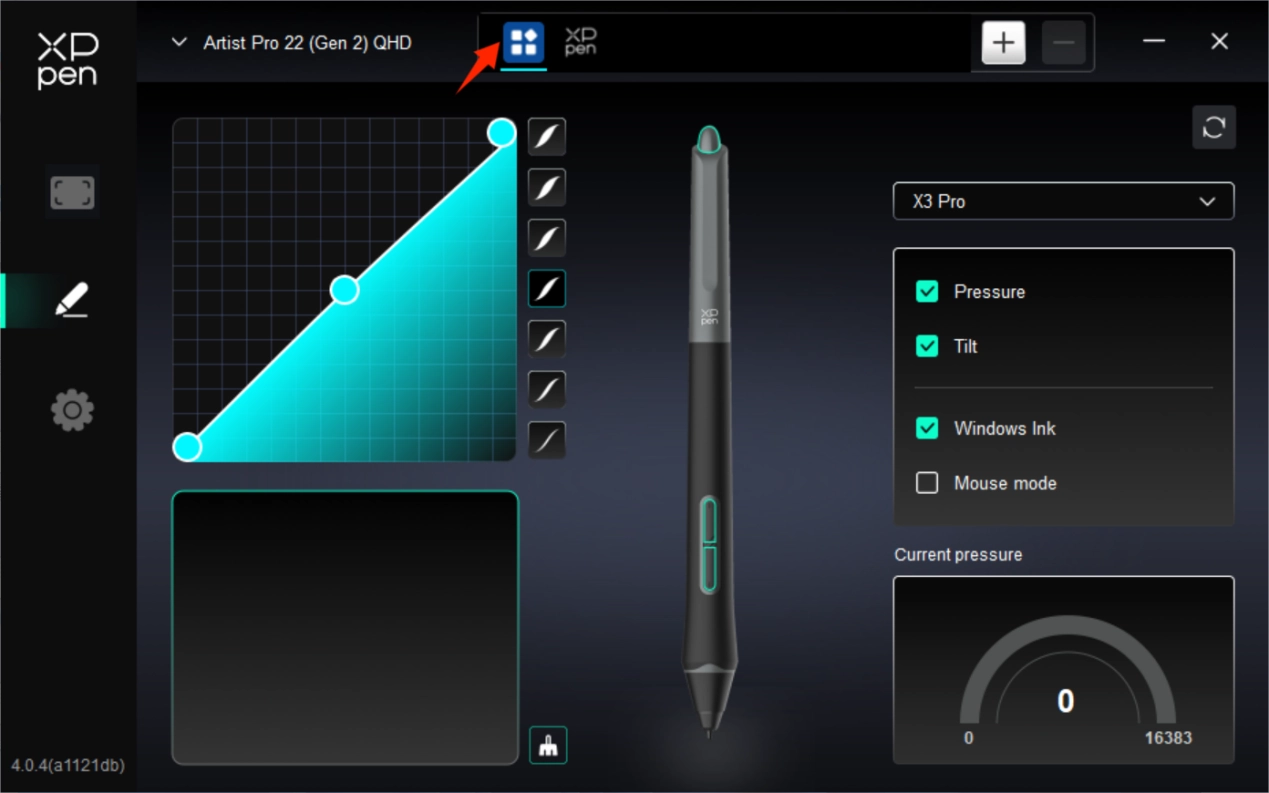
If you select all other applications, it will apply to other uncustomized applications.
5. Driver settings
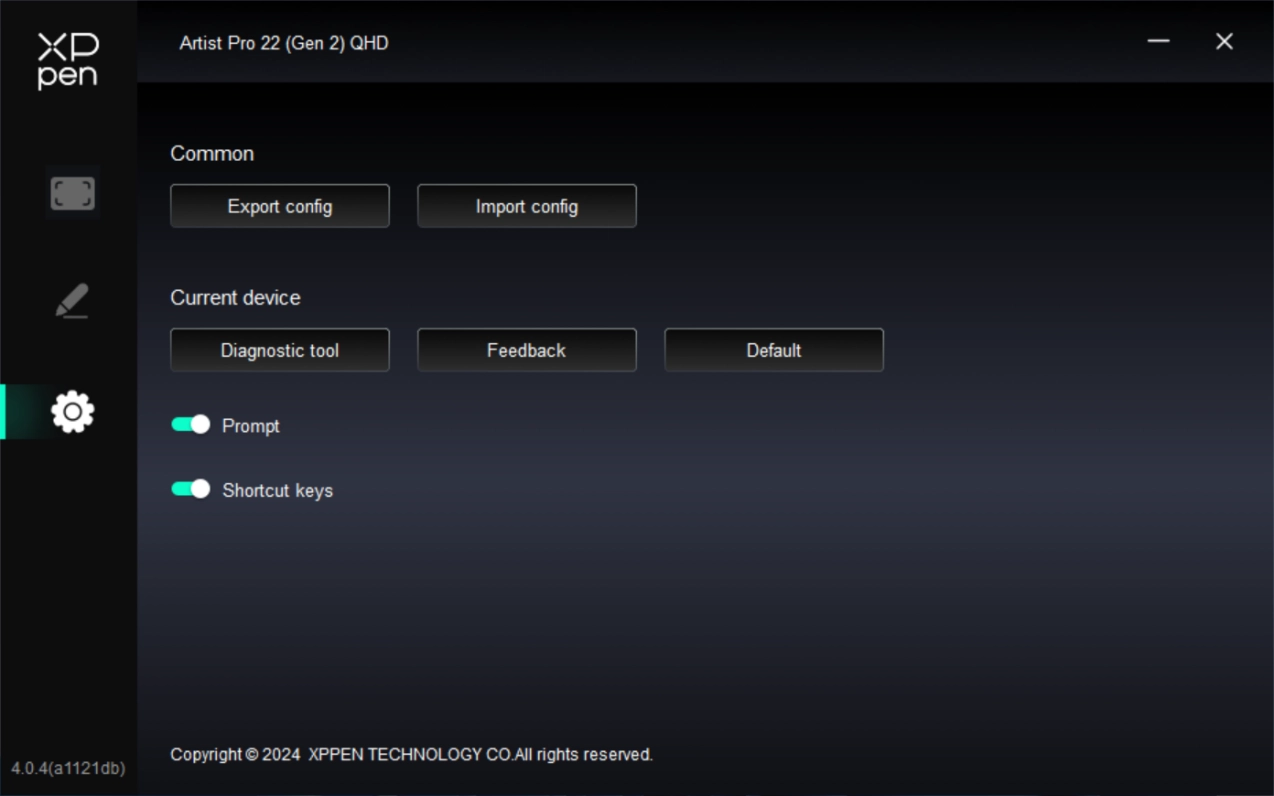
Common
Import & Export config:
You can import/export configurations to read or save settings.
This function is available for only the same operating system.
Current device
Diagnostic tool
You can use the diagnostic tool in case of any problems while using the driver.
Feedback
If you have any questions or suggestions during the use of the driver, you can give us feedback through this page.
Prompt
If closed, when you press a key, no key prompt will be displayed at the bottom.
Shortcut keys
If closed, disable the functions of all keys of the device.
3.2. Wireless Shortcut Remote
1. Application
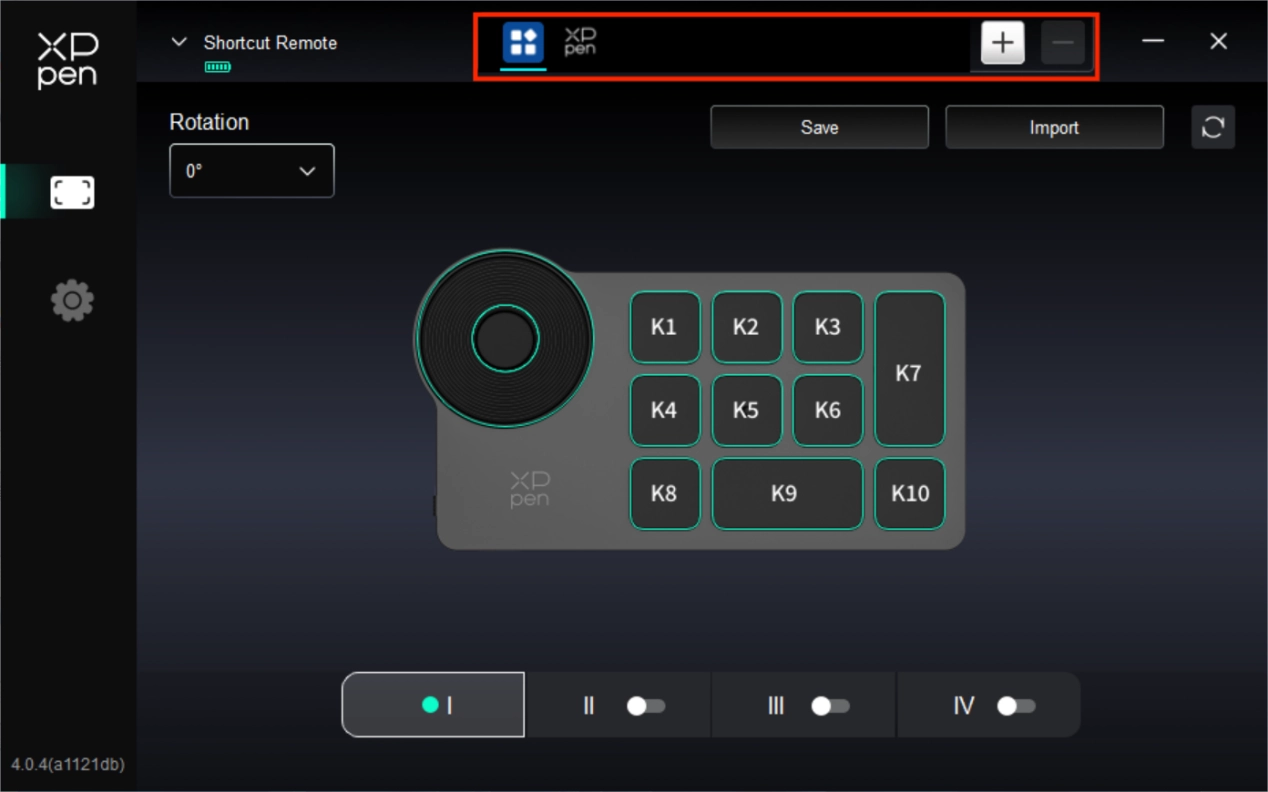
You can add up to 7 applications from the application list above as needed. The specific steps for adding are as follows:
1. Click the + icon on the top right of the application bar to open the application list;
2. Select an application to be added from the running applications or click Browse to add from the installed applications;
3. Click "OK" to add the selected application;
4. Select an added application, and click the - icon on the top right of the application bar to delete the application.
Tick one of the applications, then you can customize its Roller and shortcut keys functions. The change is valid only when you use the application. When switching between different applications, the driver will automatically recognize and switch to the corresponding Settings.
If you select all other applications, it will apply to other uncustomized applications.
2. Roller
Through the key in the middle of the roller, you can switch between the functional groups of the roller.
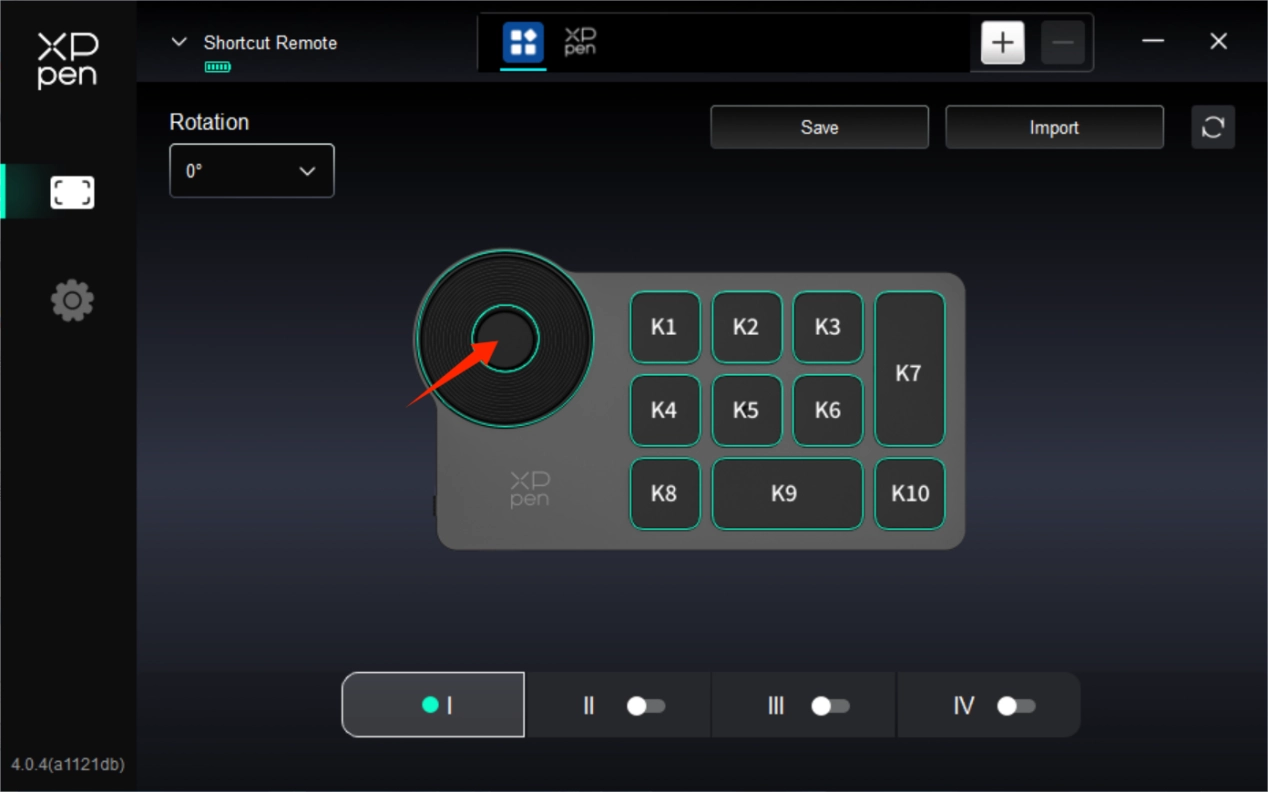
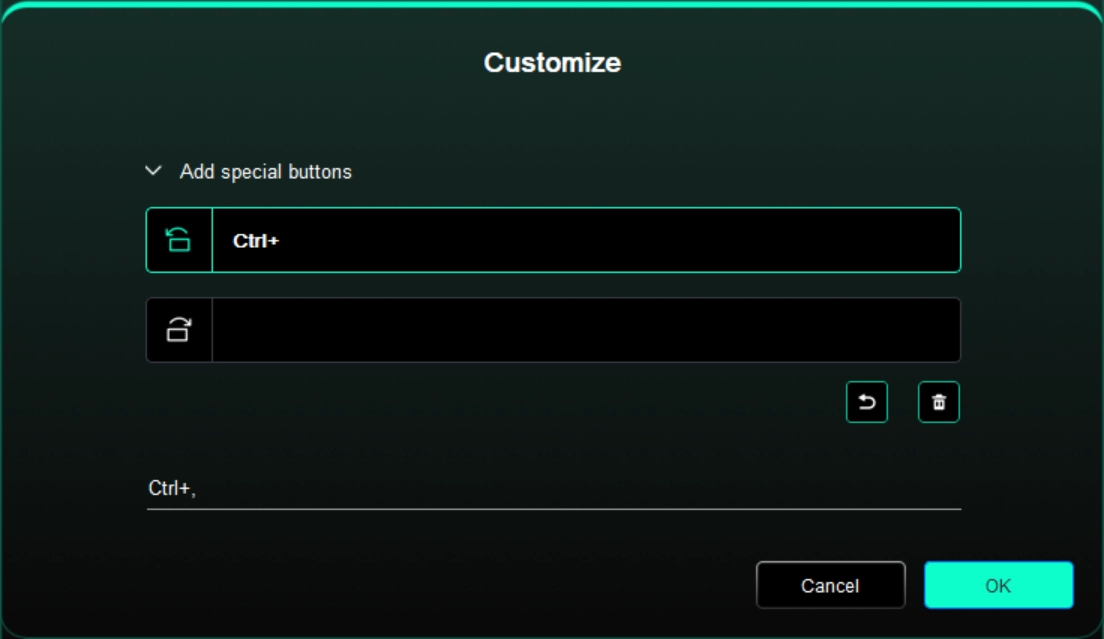
Customized
Click on the position of the roller on the image, select "Customize" from the preset function drop-down menu, and customize the clockwise and counterclockwise functions of the roller by entering the desired keys or combination keys on the keyboard.
3. Shortcut keys
The driver provides four groups of shortcut keys. The first group of shortcut keys is used by default (cannot be closed). Each group of keys can customize different functions. After enabling, you can switch between the opened groups through "key group switching" (the default is K1 key, which can be customized as other keys).
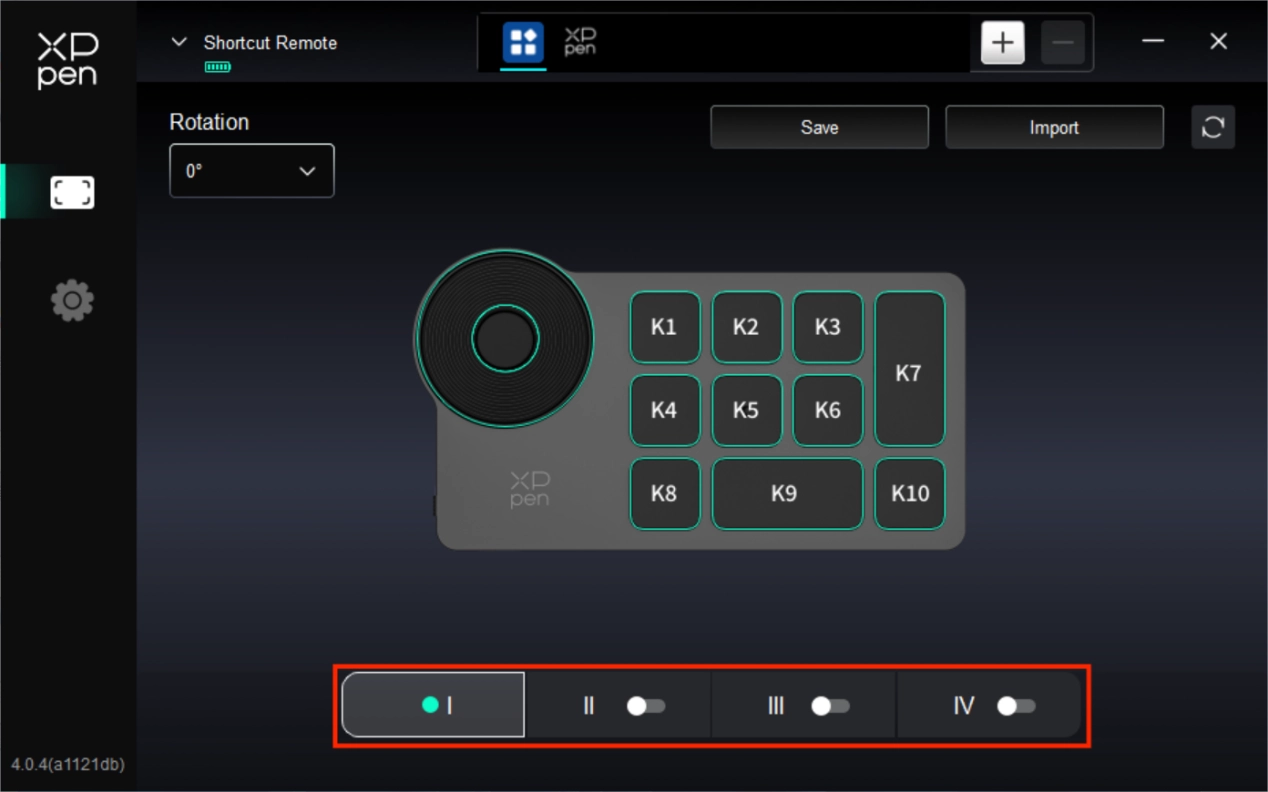
Customize
Click the corresponding button on the figure, you can open the hotkey setting interface, to customize the function Settings.
The setting or use method is the same as the pen button. lease refer to "Product Settings -> Driver Function Settings ->Drawing Display -> Pen Settings ->Pen Keys" .
Set preview

You can press the K2 key to view the key group functions in use, if you select the key group that is not opened in the drive, the group I will be used by default. Click the close button on the upper right to close the window.
4. Save/Import
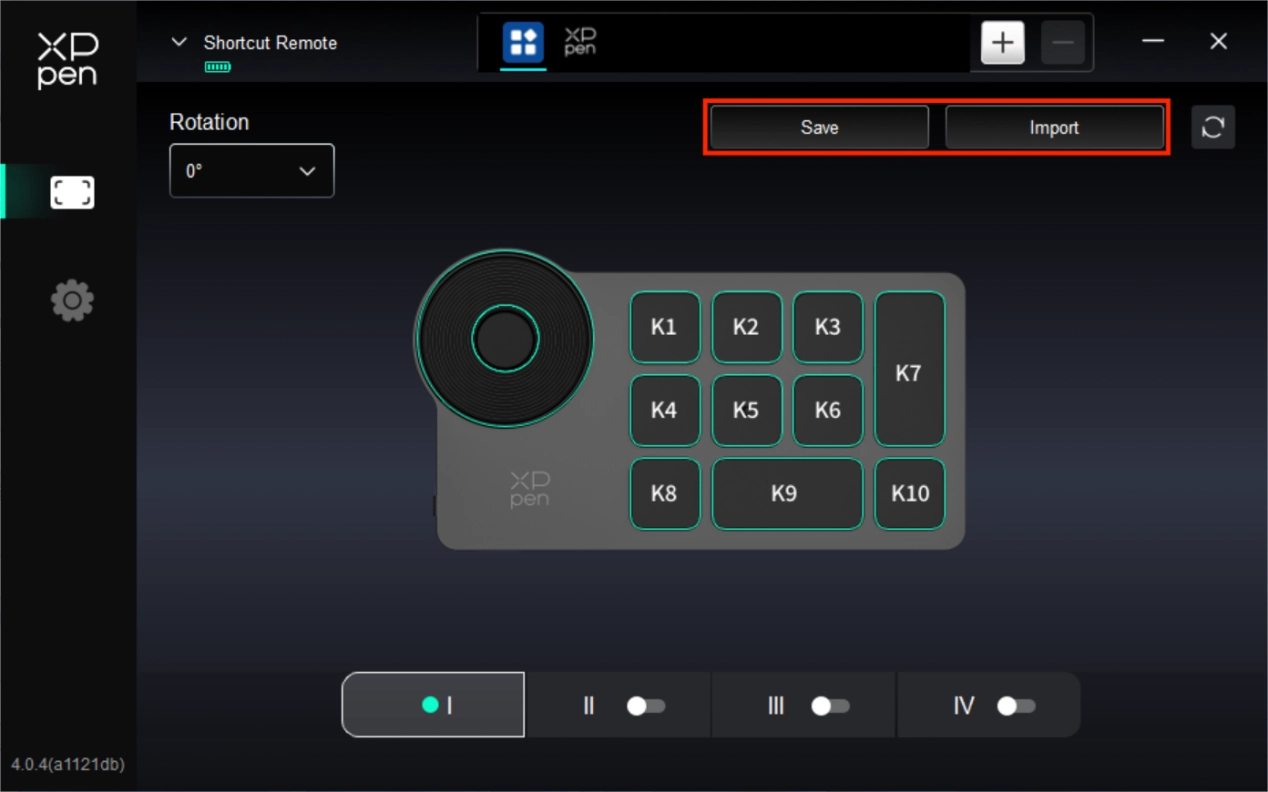
Save
Save the configuration under the currently selected application to the device.
Import
Import the configuration saved in the device into the driver of the selected application.
Note: please use the "Import" and "Save" functions in the case of wired connection. The configuration of "Import" and "Store" does not include the rotation information and is only valid under the same system.
5. Driver Settings
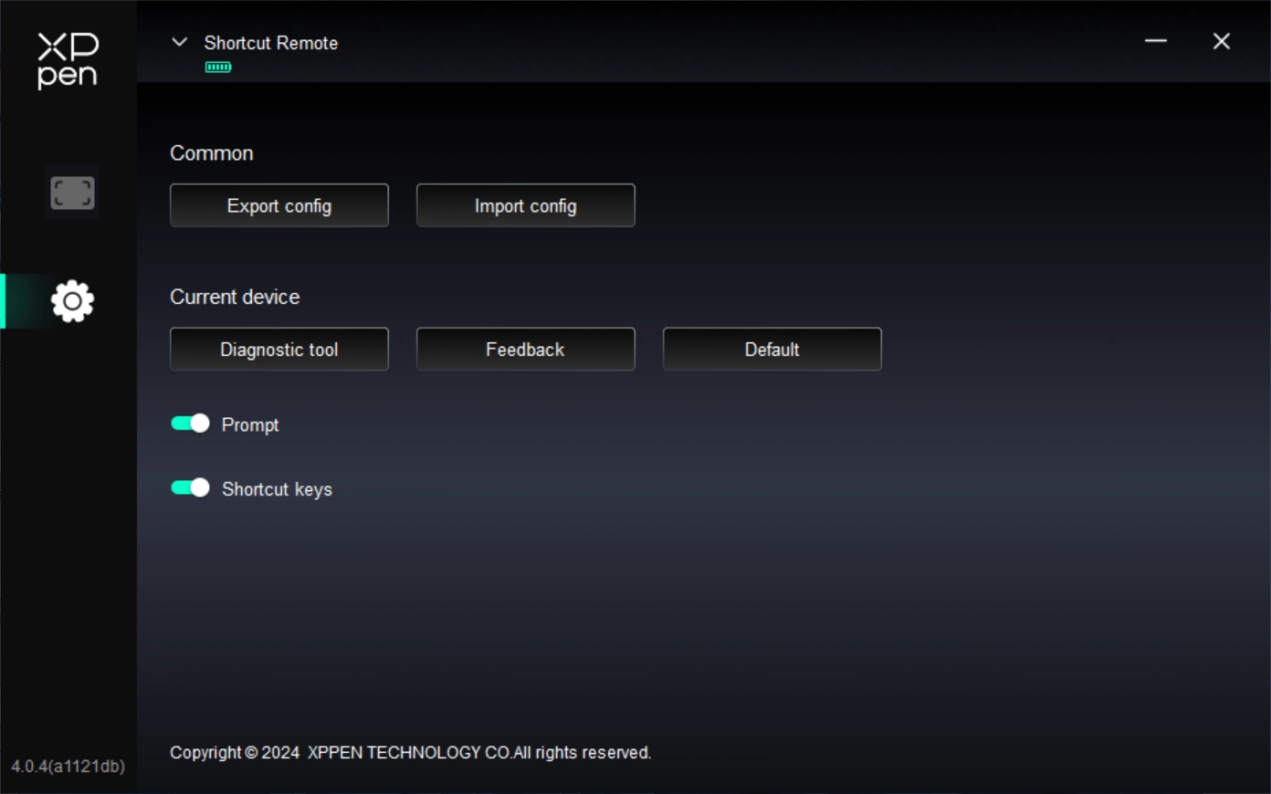
The driver Settings of the wireless shortcut keyboard are the same as those of the drawing display, please refer to "Product Settings ->Driver Function Settings-> Drawing Display -> Driver Settings" .
4. Driver Uninstallation
a) Windows
Go to Start -> Settings -> Apps -> Apps & Features, find "Pentablet" and then left click "Unload" as per prompts.
b) Mac
Go to Go -> Apps, find XP-PenPentabletPro, click "UninstallPenTablet" as per prompts.
c) Linux
Deb: Enter command “sudo dpkg -r XPPenLinux” and execute the command;
Rpm: Enter command “sudo rpm -e XPPenLinux” and execute the command;
Tag.gz: Unzip file. Enter command “sudo”. Drag uninstall.sh to the window and execute command.
1. No display or black screen on a drawing display.
1) Check if the device is connected to power supply properly.
2) Check if the cable is connected properly.
3) Check if the power indicator is blue. If not, check the cable and restart the device;
4) If the signal is unstable, check if the cable port is stable.
2. Computer fails to recognize the device.
Check if your computer's USB port used works normally. If not, use another USB port.
3. Stylus does not work.
1) Make sure you are using the stylus that originally came with your device.
2) Make sure you installed the driver correctly, and check if the pen settings of the driver is normal.
4. The drawing software cannot sense the pen pressure while the cursor can move.
1) Check if the drawing software supports pen pressure;
2) Download the latest driver installation files from XPPen website, and check if the pen pressure is normal in the driver;
3) Before installing the driver, turn off your antivirus software and graphics software;
4) Uninstall drivers for other drawing displays before installation;
5) Restart your computer after the installation is completed;
6) If the pen pressure is normal in the driver (Windows: ensure Windows Ink is enabled in the pen settings of the driver), run the drawing software and test it again.
5. Cursor offsets.
1) Confirm the mapping of the driver.
2) Calibrate the pen with the driver.
6. Line latency during drawing with the software.
1) Check if the computer configuration (CPU&GPU) meets the recommended configuration requirements for the drawing software installed, and optimize related functions via settings according to the FAQs posted on the official website of the drawing software.

The terms HDMI, HDMI High-Definition Multimedia Interface, HDMI trade dress and the HDMI Logos are trademarks or registered trademarks of HDMI Licensing Administrator, Inc.
For Artist Pro 22 (Gen2)
This Class B digital apparatus complies with Canadian ICES-003.
Cet appareil numérique de la classe B est conforme à la norme NMB-003 du Canada.
For Wireless Shortcut Remote
This device complies with Industry Canada licence-exempt RSS standard(s).
Operation is subject to the following two conditions:
(1) this device may not cause interference, and
(2) this device must accept any interference, including interference that
may cause undesired operation of the device.
Le présent appareil est conforme aux CNR d'Industrie Canada applicables
aux appareils radio exempts de licence. L'exploitation est autorisée
aux deux conditions suivantes :
(1) l'appareil nedoit pas produire de brouillage, et
(2) l'utilisateur de l'appareil doit accepter tout brouillage radioélectrique
subi, même si le brouillage est susceptible d'en compromettre le fonctionnement.
 PDF
PDF